Android Data Recovery is the best data recovery software available to recover deleted and lost data. It is designed to recover data from Android Phones & Tablets, External SD memory cards used in Android devices, and broken Android Phones & Tabs.
Below find out step-by-step complete tutorials on How to use Android Data Recovery. How It works and helps users to recover data from Android Phones & Tablets, External SD memory cards used in Android devices, and broken Android Phones & Tabs.
- Part 1: How To Recover Data From Android Device Complete User Guide
- Part 2: How To Recover Data From Android SD Card Complete User Guide
- Part 3: How To Recover Data From Broken Android Phone Complete User Guide
 |  |
 |  |
Part 1: How To Recover Data From Android Device Complete User Guide
Step 1. Connect Your Android Phone via USB cable to your computer
Launch Android Data Recovery software on your computer, (PC or Laptop) and select “Data Recovery”.

Connect your Android phone to the computer using a USB cable. Make sure you have enabled USB debugging on your Android phone. When your android device is detected on your computer and USB debugging is not enabled, the recovery tool will show brand names, you will see the screen as follows.

Just click on the logo of your phone’s brand and it will show you instructions on how to enable USB debugging, follow it, and enable USB debugging.

Step 2. Now select the file types to scan
When your phone is connected successfully to your computer, Android Data software for Android will display all the supported data that can be recovered. By default, it has checked all the file types. Now you have to just select the data that you’d like to recover.

After you have selected what you want to recover click Next, the recovery tool will scan your device to get device information.

If your Android Phone is not rooted, Android Data software will root your device. After the recovery has complete your device will again be unrooted, this process does not affect your phone or your phone’s warranty.

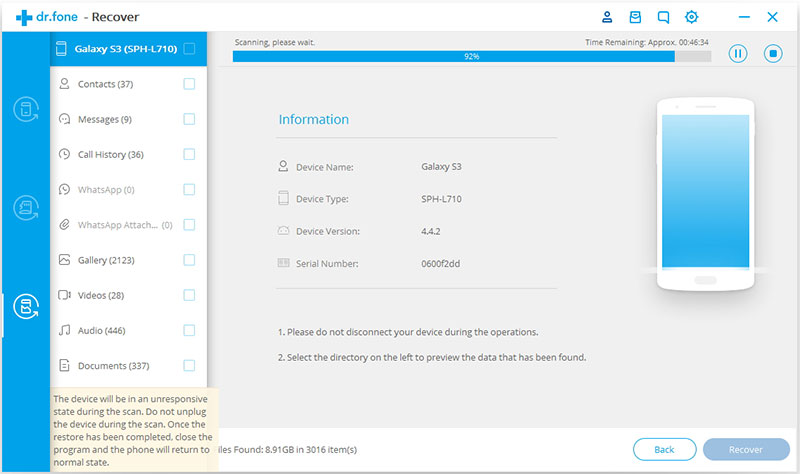
Just click Next to start data recovery. Once you click next the recovery tool will start analyzing the device to recover deleted data.

The Android Data Recovery Software will now start scanning your android device to retrieve lost and deleted data. This scan will take few minutes. So be patient and let the software complete the scan and recover data.
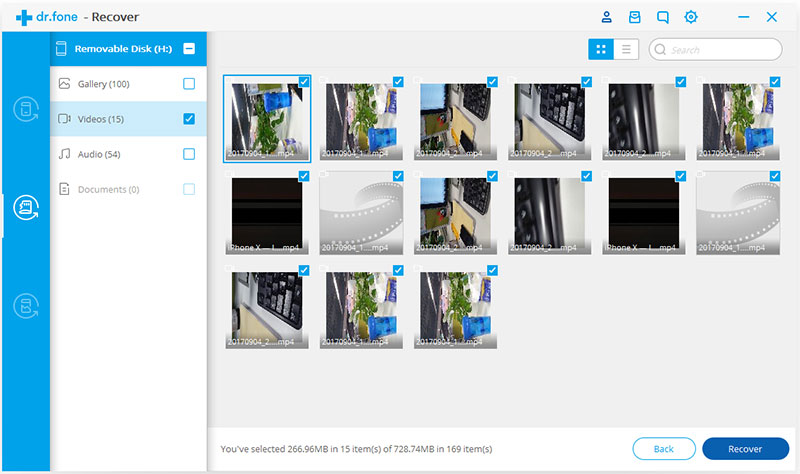
Step 3: Preview and recover data from your Android device
Now when the scan is complete, the Android Data software will display the found data, you can preview select the files you want and click recover to save the selected files. Now you can recover and restore the deleted data to your device or Recover and save data to the computer.

| |
| |
Part 2: How To Recover Data From Android SD Card Complete User Guide
Deleted data on your sd memory card by accident or intentionally no backup? This Android Data software will help you restore deleted files. To know how to follow the steps below.
Step 1: Connect an SD memory card to your computer through your Android device or a card reader.
Launch Android Data Recovery software on your computer, (PC or Laptop) and select “Data Recovery”.

Then connect the SD card to your computer and select “Recover from SD card” from the available options.
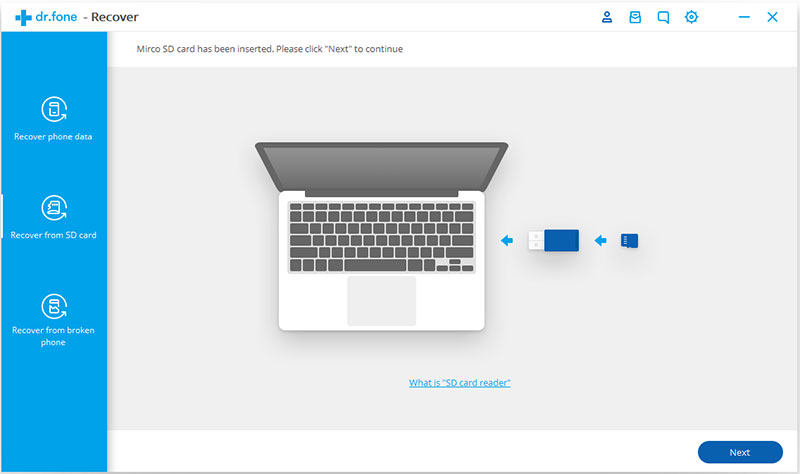
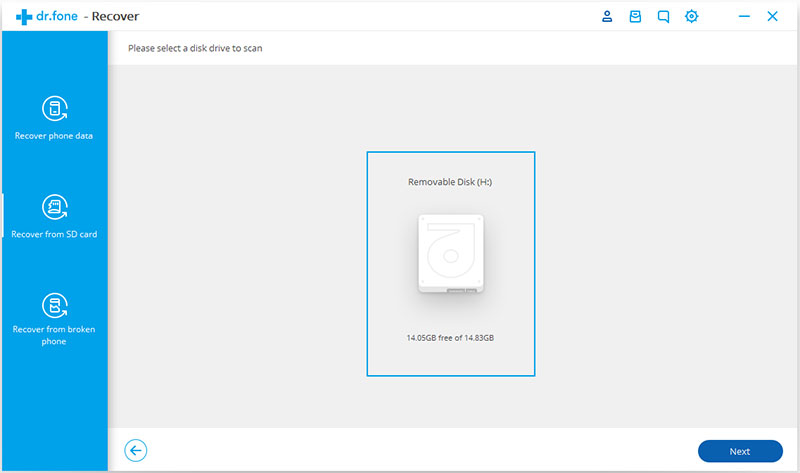
After you have selected the option “Recover from SD card” the software will display the detected card as shown in the image below. Select the SD card and press “Next” for the next process to continue.
Step 2: Start Scanning the SD memory card.
Here you can see two options available for scan Standard Mode and Advanced Mode. It’s recommended first try Standard Mode, if you don’t find the file or data you were looking for then try Advance Mode.
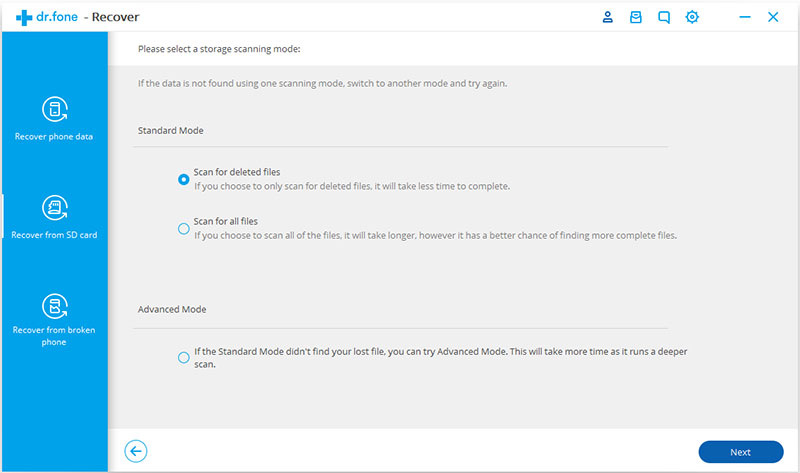
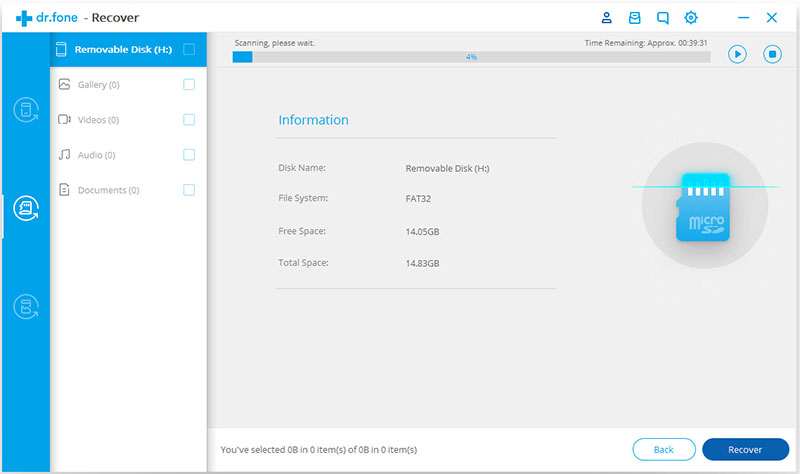
After you have selected the scan mode click on “Next” to begin scanning the SD memory card. This scan will take few minutes. So be patient and let the software complete the scan and recover data.
Step 3: Preview and recover data from your Android SD Memory Card.
Now when the scan is complete, the Android Data software will display the found data, you can preview select the files you want and click recover to save the selected files. All files will be saved on your computer.
| |
| |
Part 3: How To Recover Data From Broken Android Phone Complete User Guide
In situations when our Android phone is partially damaged liked a broken screen, damaged by water, black screen, In such situations we are not able to access valuable data, like messages and contacts and more other things stored in Android Pone’s internal memory. Here in situations like this, the Android Data Recovery Software is very helpful to retrieve those inaccessible data. To know how to follow the steps below.
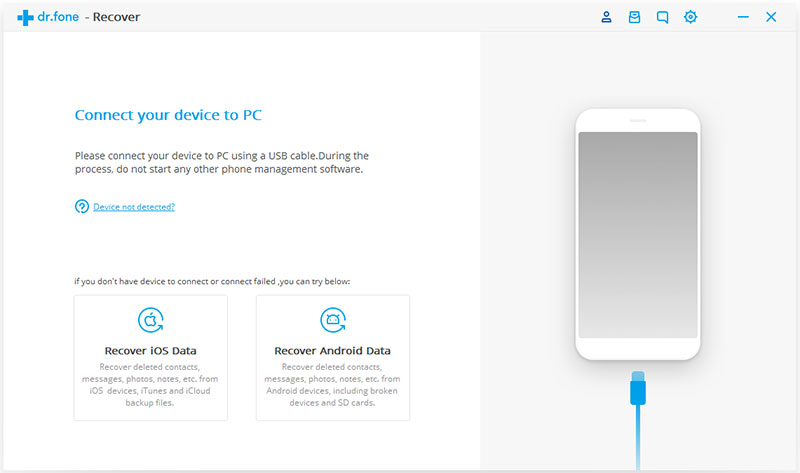
Step 1: Connect your Broken Android phone to your computer.
Launch Android Data Recovery software on your computer, (PC or Laptop) and select “Data Recovery”.
Connect your Android phone using a USB cable to your computer. Then select and click “Recover Android Data” from the Android Data software screen.
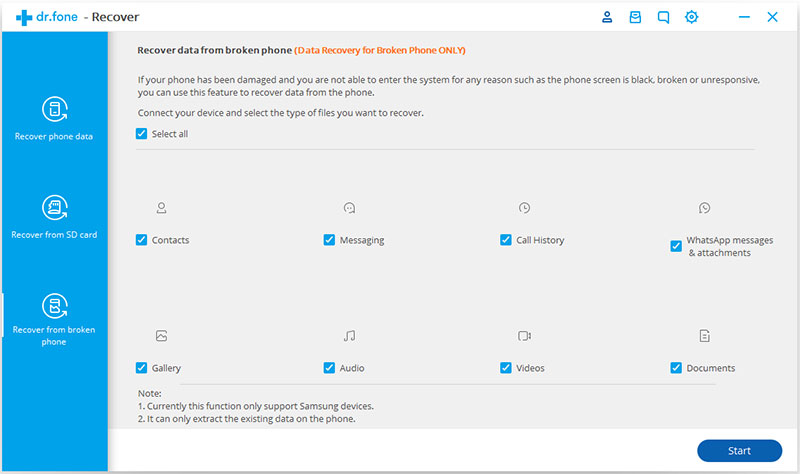
Step 2: Select the type of data you want to retrieve from the broken Android Phone.
Now by default, the Android Data recovery software automatically selects all types of data. Here you can select the type of data you need. Select and press “Next” to proceed.
Important Note: In this scenario, the Android Data Recovery software will help you recover the existing data on the broken Android phone.
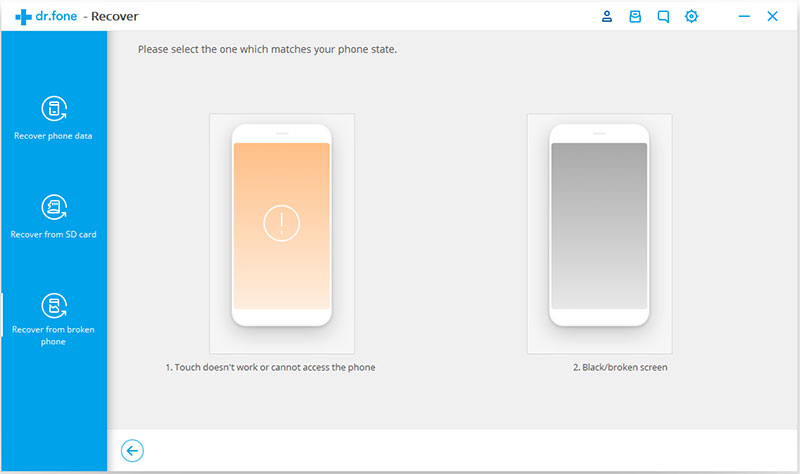
Step 3: Select the type of defect your Android Phone has.
The Android Data Recovery software work in two types of defect of your Android phone, the First condition is when Touch does not work or cannot access the phone, second Broken/black screen. Just choose the condition your phone is in, the Android Data Recovery software will then take you to the next step.
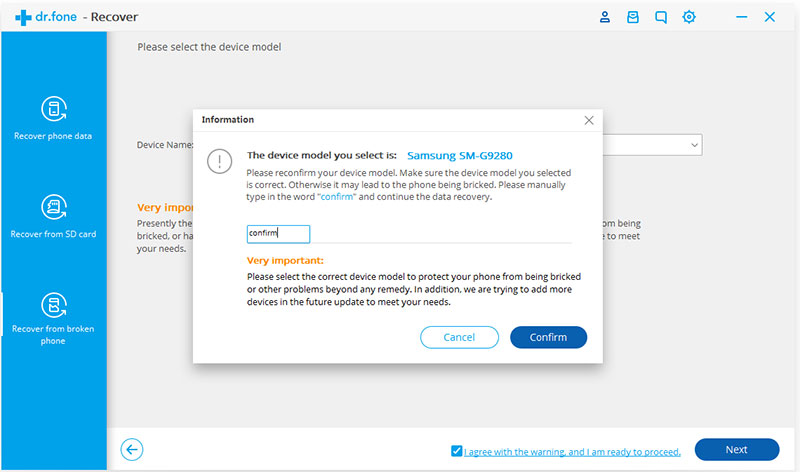
Then you can see a new window where you can see Android Device name and model here choose your correct device name and model. Then press “Next”. At present this function only works for some Android brand’s devices and Samsung devices like Galaxy Note, Galaxy S & Galaxy Tab series.
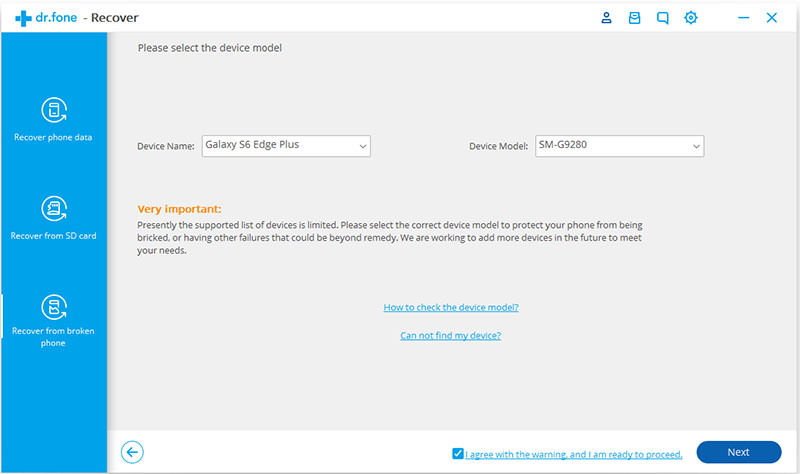
Important Note: Please make sure you select the right android device name and the model for your Android phone. If you select wrong the Android Data Recovery software will get wrong information which may lead to bricking your Android Phone ( Bricked phone means your phone won’t turn on in any way, shape or form, and there is nothing you can do to fix it) or any other errors. If your information is correct, put in “confirm” and press on the “confirm” to continue.
Step 4: Go into Download Mode on the Android Phone.
Now go into download mode on Android by following the instruction on the program.
- Power off the Android Phone.
- Press and hold “volume down” + “Home” + “Power” buttons altogether on the Android Phone.
- Press the “Volume Up” button to enter into download mode.
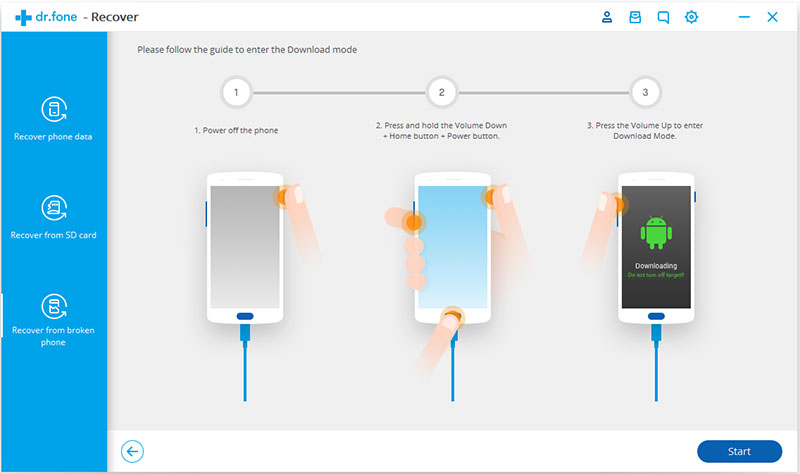
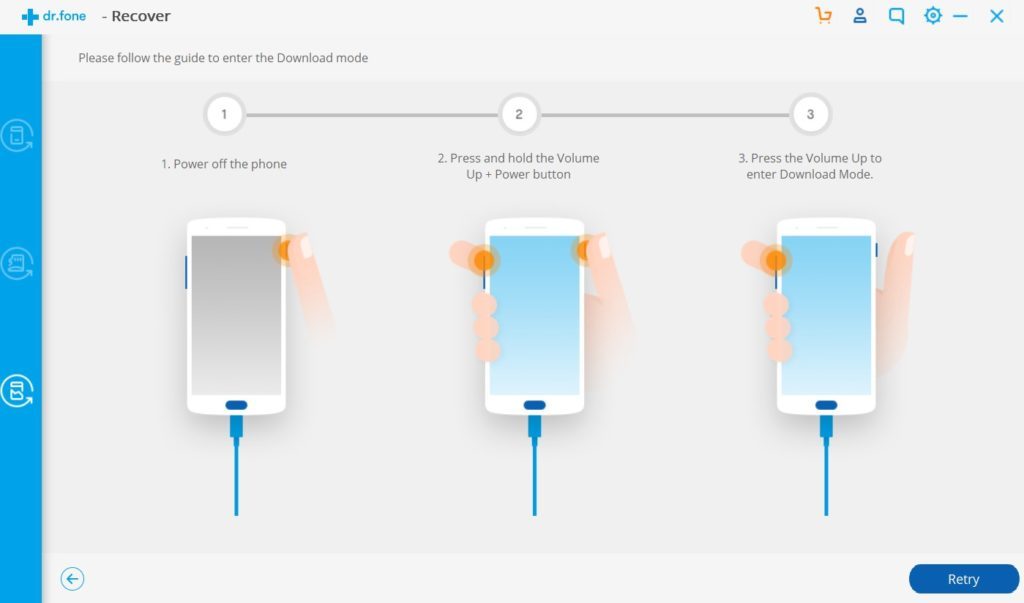
If your smartphone doesn’t have a Home button.
Now go into download mode on the Samsung by following the instruction on the program.
- Power off the Samsung Phone.
- Press and hold the “Volume up” + “Power button” buttons altogether on the Samsung Phone for few seconds.
- Then release the “Power button” and press the “Volume Up” button to enter into download mode.
Step 5: Analyzing the Android phone.
Once your phone goes in Download mode, Android Data Recovery software will analyze your Android Phone and download the recover the recovery package.
Step 6: Preview and recover the data from the broken Android phone.
When the Android Data Recovery software completes analyzing and scanning, it will display all the file types by categories. Now you will be able to choose the files to preview. Select the files you need and press “Recover” to save the files. All files will be saved on your computer.

| |
| |