It is always better to be SAFE than SORRY! As we are aware that no matter how advanced our smartphones are or no matter how careful we may be, data loss seems to be unavoidable. Accidental deletion is most common, and happens unintentionally with one wrong press.
Let’s look some of the common scenarios which causes data loss from your Redmi Smartphones.
Common Causes Of Data Loss From Redmi 7/7A, Redmi Note 7/ 7S/ 7 Pro
- Factory resetting deletes all your saved files.
- Accidental deletion is most common, it happens unintentionally with one wrong press.
- Formatting you Redmi smartphone also deletes all data.
- SD card issues.
- By Virus infection when your get contents from other devices or download from untrusted sites.
- Locked Android Device (Forgot Pin, Password, Fingerprint or Pattern Lock).
- ROM Flashing.
- Screen damaged or broken.
- Backup not sync and updated Android OS.
Lots more.
Like above given examples there can be many reasons and situation which could result in deletion or loss of valuable data from your Redmi 7/7A, Redmi Note 7/ 7S/ 7 Pro.
So, it is wiser to take preventive measures to secure and protect the important data and files on your phone in advance, that’s why it is extremely important that you backup your important data and files on your Redmi 7/7A, Redmi Note 7/ 7S/ 7 Pro to computer or cloud storage frequently to secure your data and files.
To backup data & restore your Redmi 7/7A, Redmi Note 7/ 7S/ 7 Pro there are many tools and ways, out of which we have selected the 3 of the best way to Backup and Restore Redmi 7/7A, Redmi Note 7/ 7S/ 7 Pro. Below given solution also works with all Redmi Smartphones.
Support all Xiaomi Redmi Smartphones such as Redmi Go, Redmi 6, Redmi 6a, Redmi Note 6Pro, Redmi 7, Redmi 7A, Redmi Note 7 Pro, Redmi Note 7S, Redmi 8, Redmi Note 8 etc.
Quick Links To Content
- Solution 1. Backup and Restore Data From Redmi 7/7A, Redmi Note 7/ 7S/ 7 Pro Using Google Account.
- Solution 2. Backup and Restore Data From Redmi 7/7A, Redmi Note 7/ 7S/ 7 Pro Using Mi Cloud.
- Solution 3. Backup and Restore Data From Redmi 7/7A, Redmi Note 7/ 7S/ 7 Pro Using Android Backup & Restore Software.
- Bonus Tip: Know How To Recover Deleted Data on Redmi 7/7A, Redmi Note 7/ 7S/ 7 Pro When You Have No Backup.
Download Android Backup and Restore Software
 |  |
Below find out step by step tutorial how to backup and restore Redmi 7/7A, Redmi Note 7/ 7S/ 7 Pro
Solution 1. Backup and Restore Data From Redmi 7/7A, Redmi Note 7/ 7S/ 7 Pro Using Google Account.
Google accounts provide you free combined storage for an account up to 15 GB per account. You can use Google’s cloud service apps like, Google Drive and Photos to back up data on your Redmi 7/7A, Redmi Note 7/ 7S/ 7 Pro smartphone, and you can simply manage data and restore when needed.
Let’s see how to use Google account to Backup data, with this service you can back up App data, Call History, Contacts, Device settings, Photos & Videos, SMS text messages.
Part 1. How to Back up Data Using google account.
Step 1. Go to Menu> Settings>Google.
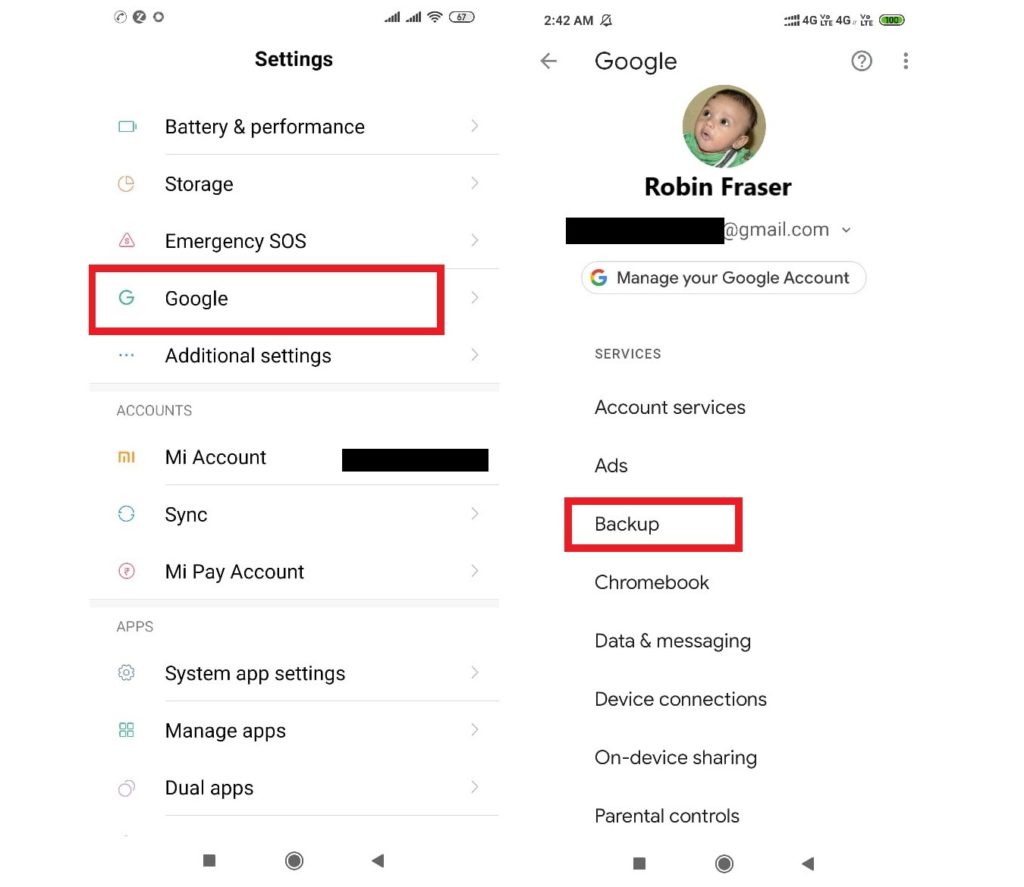
Step 2. Touch and open Google here you can see your Google account info. Among all options click on Backup.
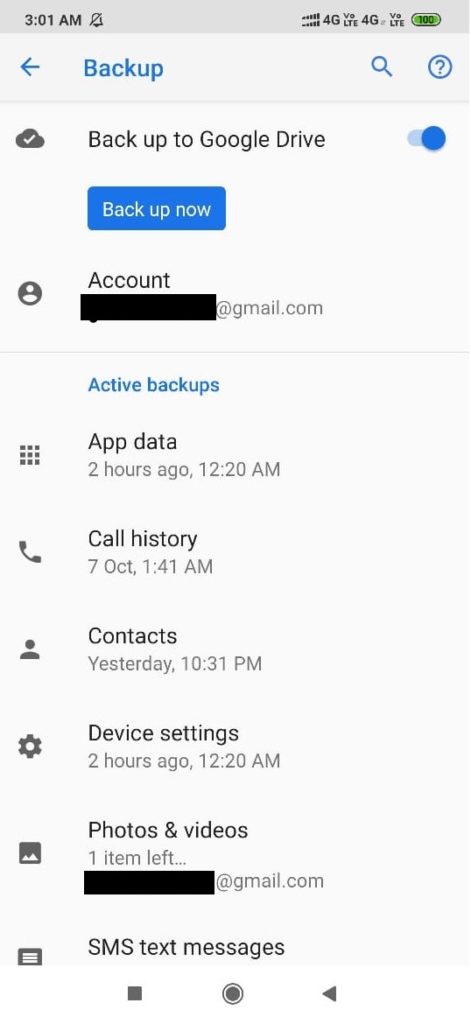
Step 3. On this Screen you can check your phone’s Backup history, to begin Backup just click ‘Back up now’
Also Read- How To Recover Deleted Data From Redmi Note 9Pro/ 9Pro Max/ 9S
Restore Backup data on google account.
Your Apps and apps data are saved on google account if you delete an app later when you again install it its automatically restored to by backed up app data. You just have to make sure you are logged in with same account credential which was used for back up.
Steps to Restore From Google Drive

Step 1. Open browser on your Computer & go to https://drive.google.com or you can open Drive app on your Redmi 7/7A, Redmi Note 7/ 7S/ 7 Pro smartphone.
Step 2. Sign in with the same Gmail id that you used to back up your Redmi 7/7A, Redmi Note 7/ 7S/ 7 Pro files to Google drive.
Step 3. Once you signed in, you can preview all the uploaded files.
Step 4. Now select the file and download it. To download multiple files on computer, press ‘SHIFT’ to select other files.
Step 5. Once you have selected files, right click and click on download.
All files will be downloaded and restored.
Also Read: How To Recover WhatsApp Messages/Photos And Videos Deleted By Sender
Part 2. Back up Photos and Videos using ‘Google Photos’
Now as per last update ‘Google Photos’ App is no longer in sync with ‘Google ‘Drive’. So, to Back up your ‘Photos and Videos’ you have to use Google Photos separately it’s no longer syncs with ‘Drive’.
Go to menu find the Photos App open it. and log in using your google account or gmail id.
When you open for first time it will ask for permission to back up give permission for the data you would like to back up it will back up phone camera’s photos and videos automatically, if you want to back up folders please select the folders and it will automatically back up photos videos from that folder.
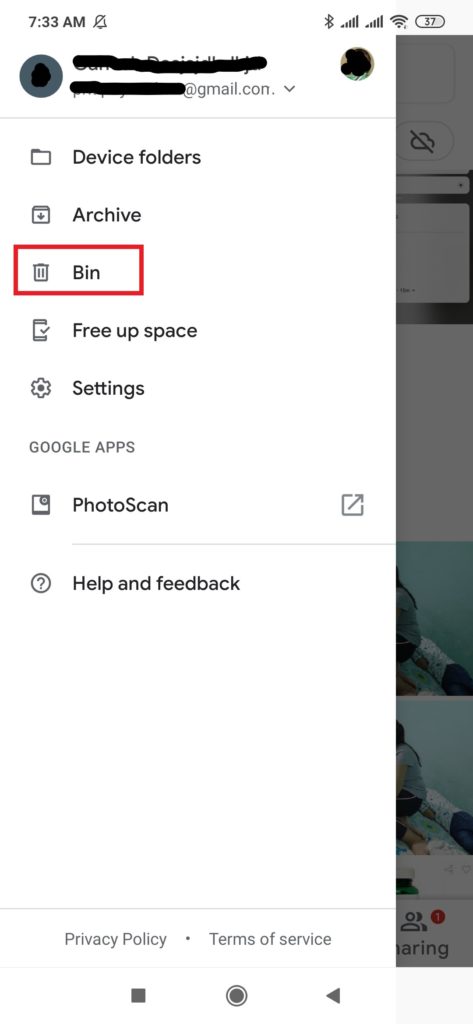
Now, if have done that and using Google’s Photos, you can simply open the apps select the content you want and download and restore it. In case if you have deleted photos on app you can still recover it from the photos ‘Bin’.
Once Photos videos are backed up you can manage it from anywhere on any device just have to to log in with same google account id.
Important Note: Google Photos apps keeps the deleted contents in Photos Bin for max 60 days after 60 days its automatically deleted forever.
You May Like To Know- How To Transfer Data From Old Phone To Redmi Note 9 Pro/ 9 Pro Max
Solution 2. Backup and Restore Data From Redmi 7/7A, Redmi Note 7/ 7S/ 7 Pro Using Mi Cloud.
Like Google Xiaomi also provides its users free cloud storage known as Mi cloud, it has free storage up to 5 GB, you can use it to back up data contact, messages, gallery, notes, recordings etc.
Part 1. Back up data to Mi cloud.
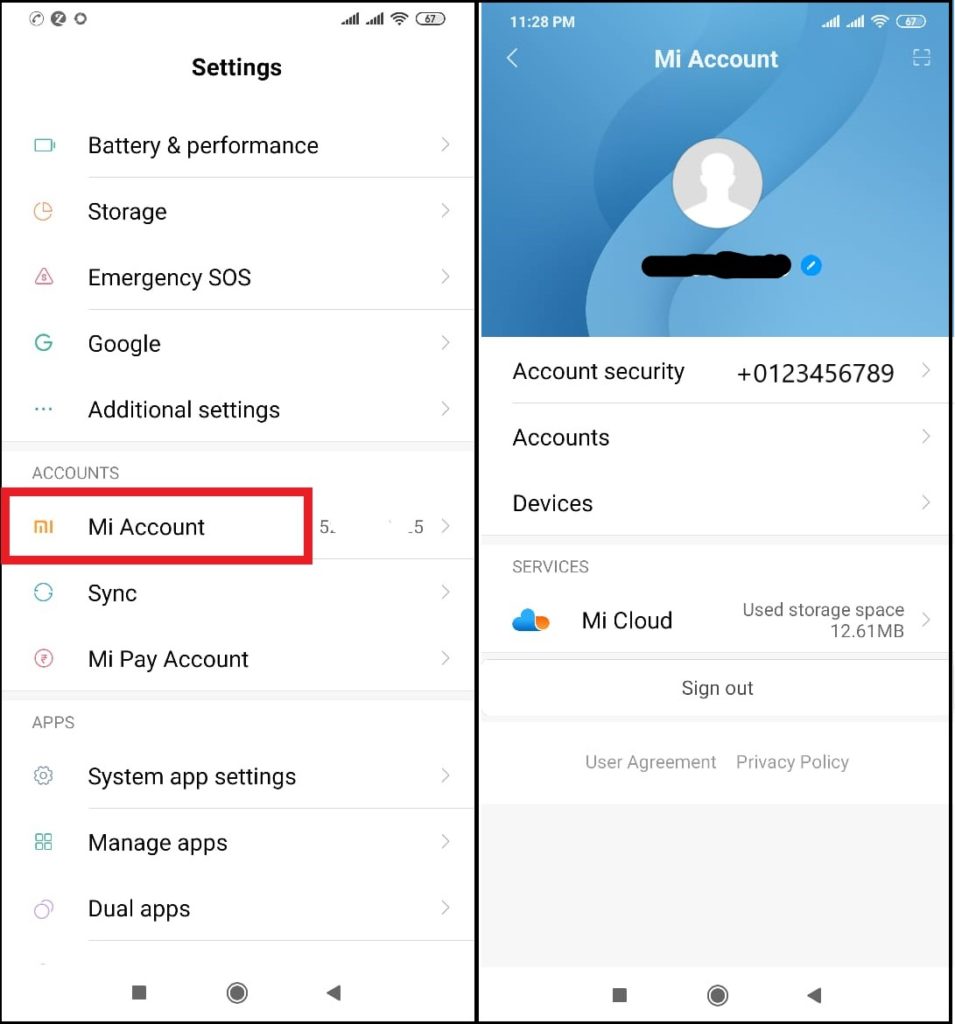
Step 1. Go to Settings scroll down find Mi cloud and open it, if you are using it for first time you have to log in, you get two options to log in, first by entering OTP send to registered mobile number, second you can enter your Mi account number and password and log in.
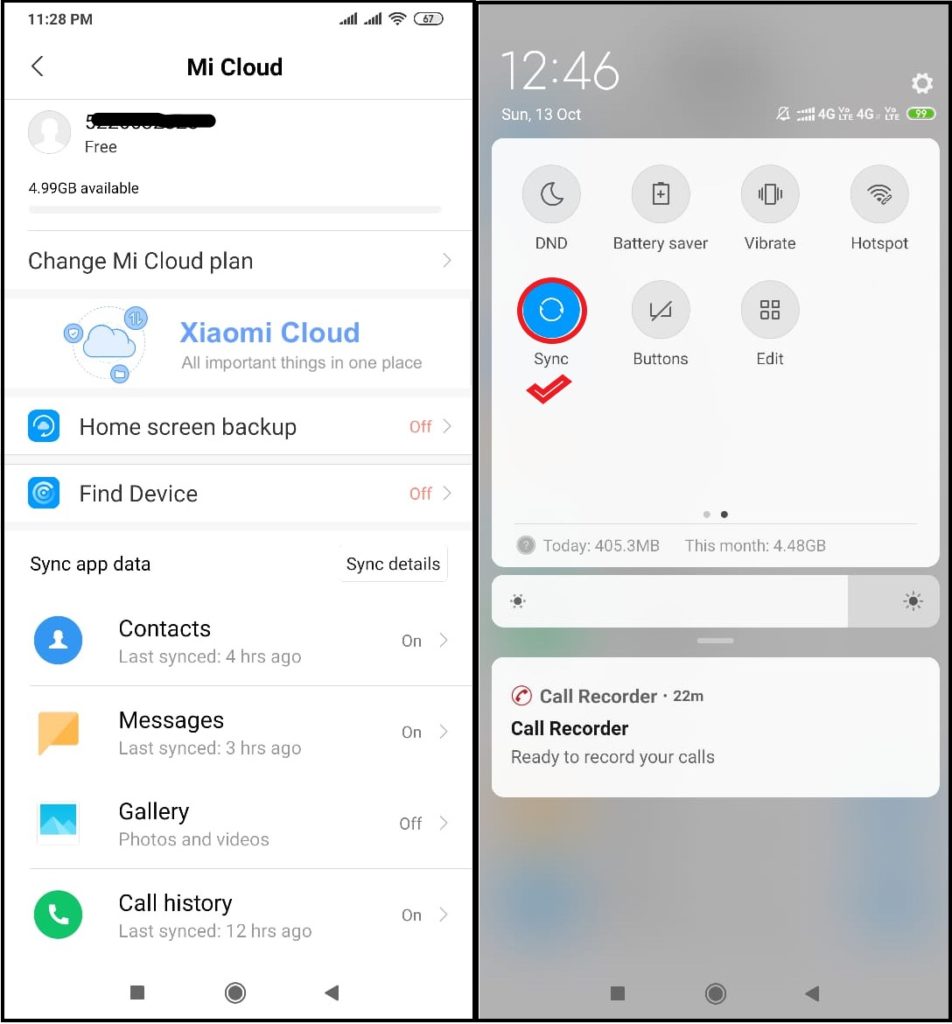
Step 2. Choose what to back up, after you log in on next screen touch and open Mi cloud and choose content types you want to back up, you have to turn on each content. Now just have to keep sync on and it will automatically back up.
“It’s my recommendation that if you use Mi Cloud don’t back up gallery to Mi cloud as it has limited 5 GB of free storage, as gallery contains lots of data photos and videos it will consume free space very quickly. Use Google’s Photos app instead to back up gallery its easy to access and have 3 times more storage space”.
Part 2. Restore manage Mi cloud data.
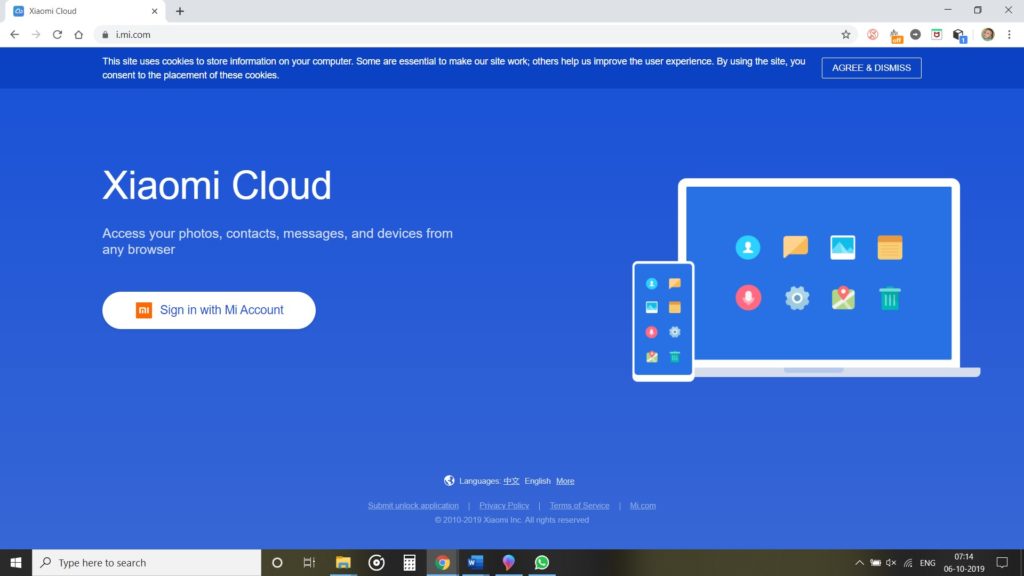
Step 1. Open browser on your Redmi 7/7A, Redmi Note 7/ 7S/ 7 Pro and open https://i.mi.com/ Sign in into your Mi Account. You can use your phone number linked to your Mi Account and log in.
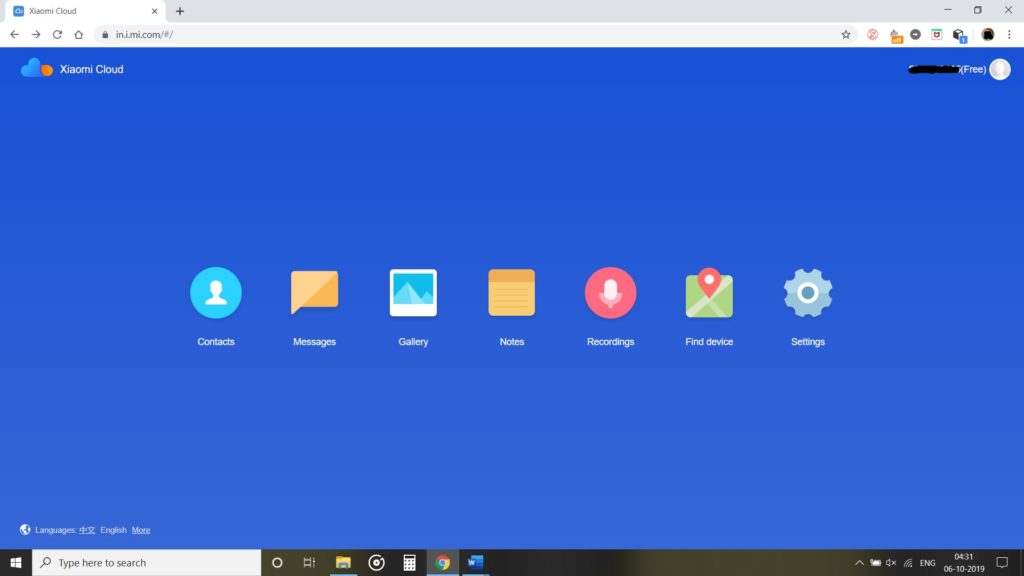
Step 2. Once you are logged in you can see the types of files, click on the content you want, select and download and restore.
Also Read- Best Ways To Recover Deleted/Lost Data From Redmi 7/7A/ Redmi Note 7/ 7S/ 7 Pro
Solution 3. Backup and Restore Data From Redmi 7/7A, Redmi Note 7/ 7S/ 7 Pro Using Android Backup & Restore Software.
Here you will discover simple step by step complete tutorials How to use Android Backup & Restore. How It work and help users to restore data from Redmi 7/7A, Redmi Note 7/ 7S/ 7 Pro.
Download Android Backup and Restore Software
| |
Steps To Backup Redmi 7/7A, Redmi Note 7/ 7S/ 7 Pro Data To PC
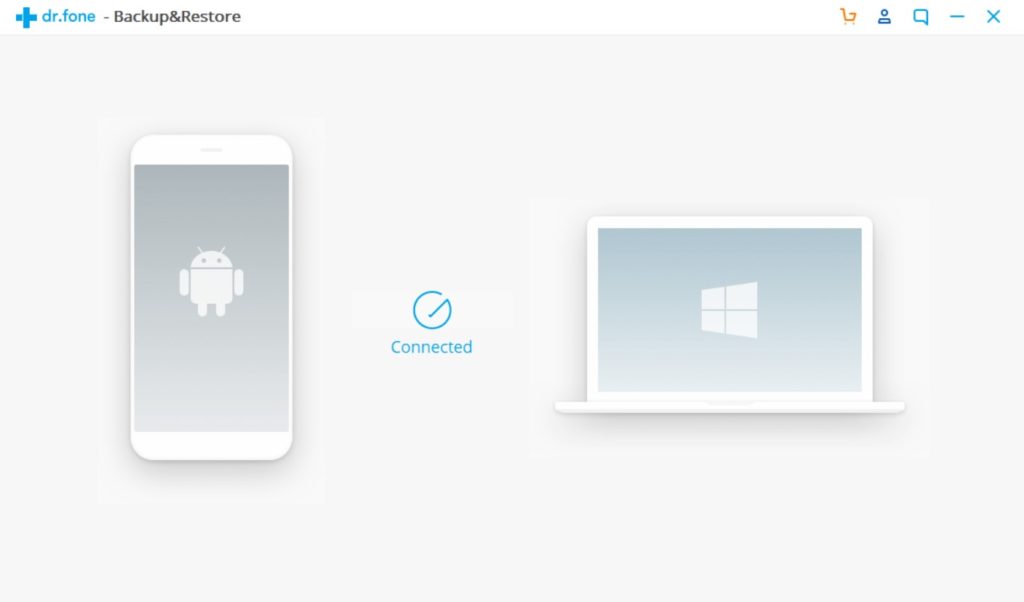
Step 1- Connect your Redmi 7/7A, Redmi Note 7/ 7S/ 7 Pro to Computer
Launch Android Data Backup and Restore software on your computer (PC or Laptop) and select “Backup & Restore” option.

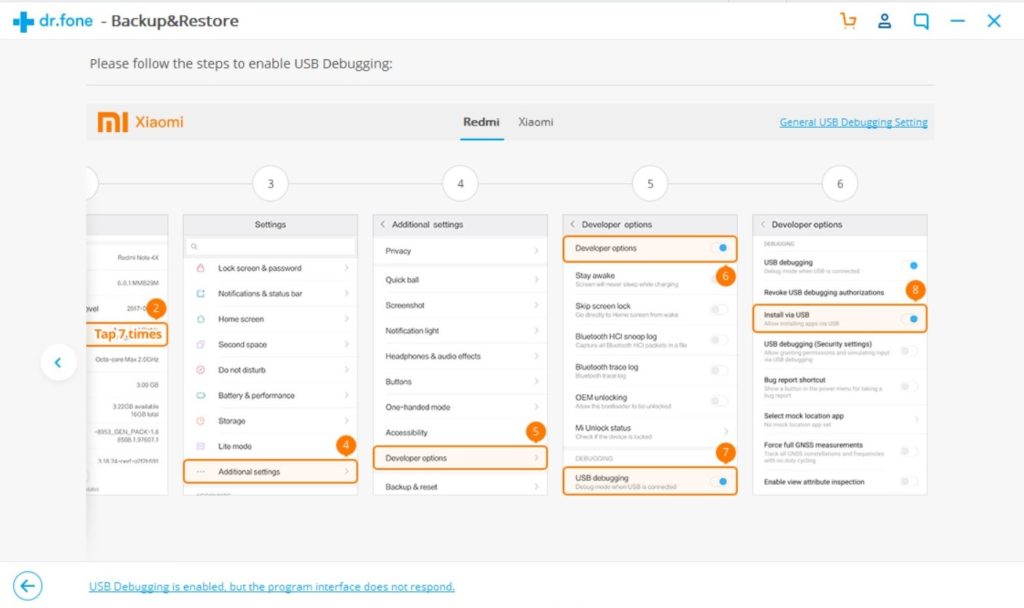
Use a USB cable to connect your Redmi 7/7A, Redmi Note 7/ 7S/ 7 Pro to your computer. Make sure you have enabled USB debugging on your Android phone. When your Redmi 7/7A, Redmi Note 7/ 7S/ 7 Pro is detected on your computer you will get a pop up asking you to allow USB Debugging.
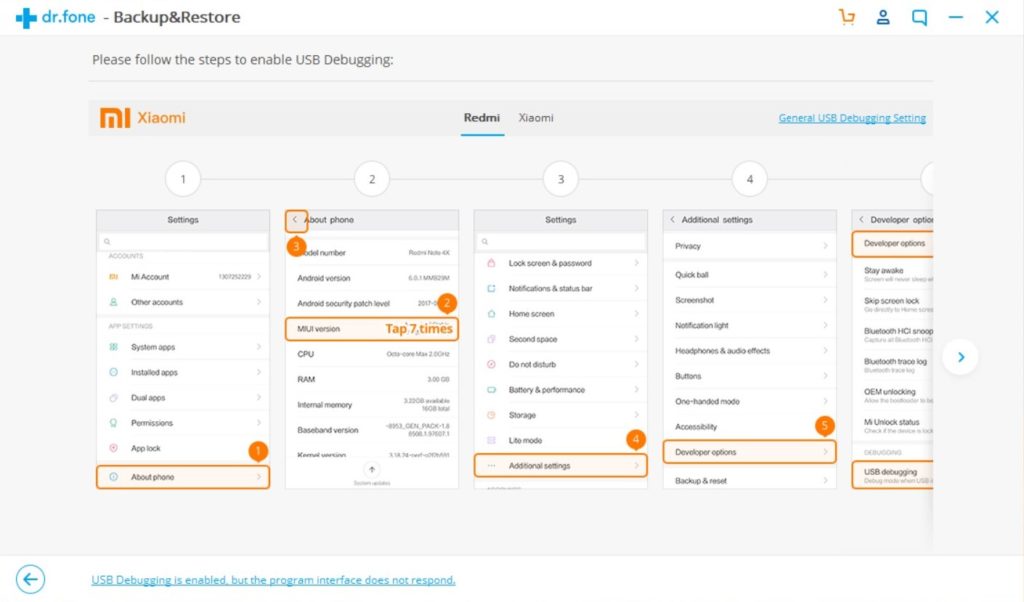
Refer the instruction given by the software and enable USB debugging and allow app installation via USB, for reference check the images.
Now when your Redmi 7/7A, Redmi Note 7/ 7S/ 7 Pro is connected to your PC, simply click on Backup to start the Android Phone data backup.
In case you have used the software before and backed up the Android data, then you can click on “view backup history” and view past backup.
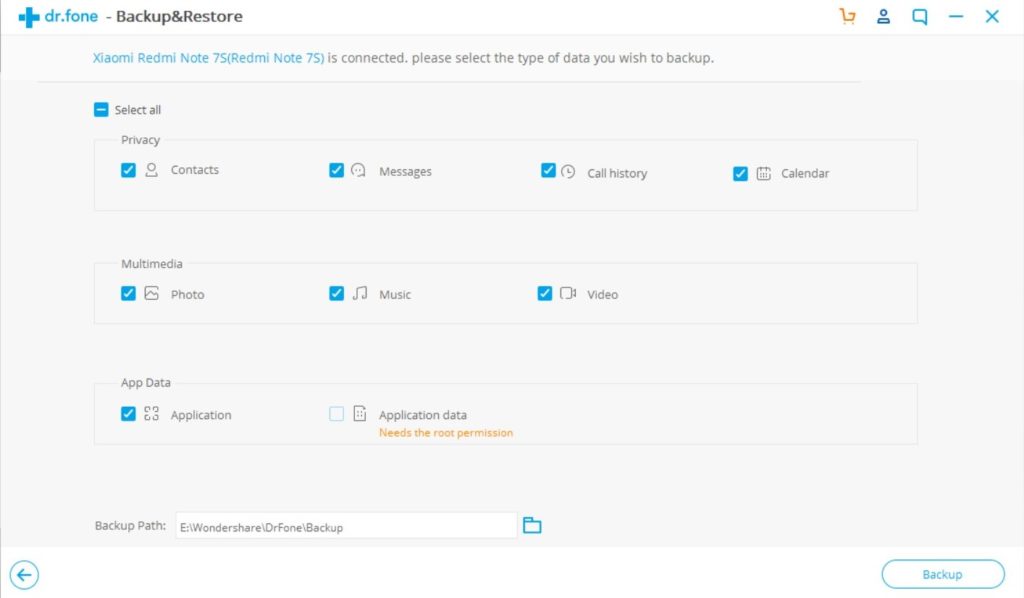
Step 2 – Choose types of files to Back up
Once your Redmi 7/7A, Redmi Note 7/ 7S/ 7 Pro gets connected with Computer, choose the types of files you wish to backup, the software is programmed to automatically check all the types of files for you. Now just press on “Backup” to begin the process.
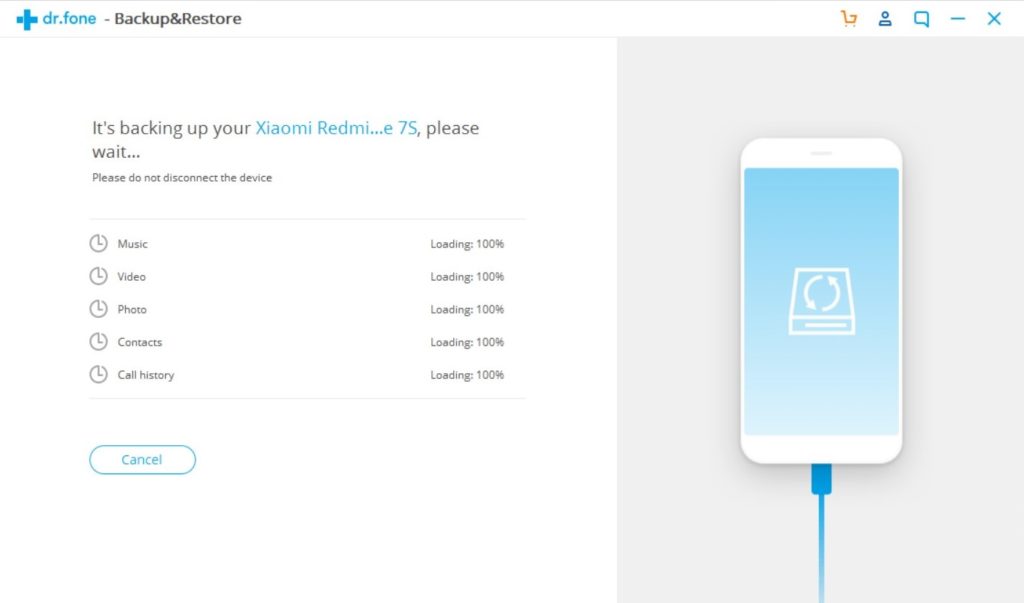
During backup process do not disconnect the Redmi 7/7A, Redmi Note 7/ 7S/ 7 Pro ; don’t use your Redmi 7/7A, Redmi Note 7/ 7S/ 7 Pro or delete any file while the backup process is progress.
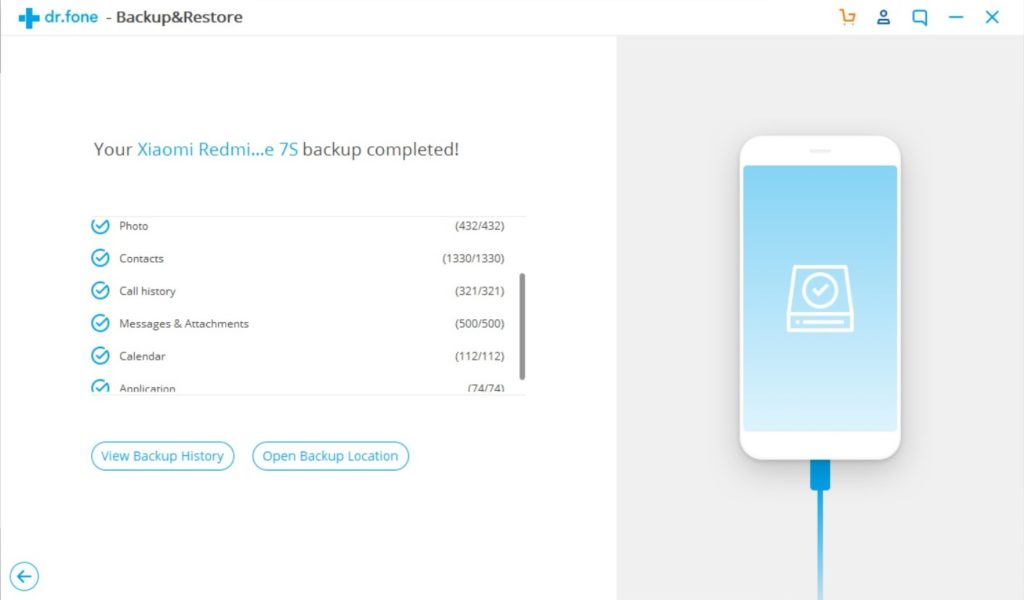
Once the complete backup is done, you can press “view the backup” option to see all the files that have been backed up.
Also Read- How To Recover Deleted/Lost Data From Redmi Note 8/Redmi 8/ 8A
Steps To Restore Backed-up Data Back To Your Redmi 7/7A, Redmi Note 7/ 7S/ 7 Pro
Step 1 – Connect your Redmi 7/7A, Redmi Note 7/ 7S/ 7 Pro to Computer
Launch Android Data Backup and Restore software on your computer (PC or Laptop), then in tools select “Backup and Restore” use a USB cable to connect your Redmi 7/7A, Redmi Note 7/ 7S/ 7 Pro to your computer.
If you have disabled USB debugging enable it to connect your Redmi Phone with computer.
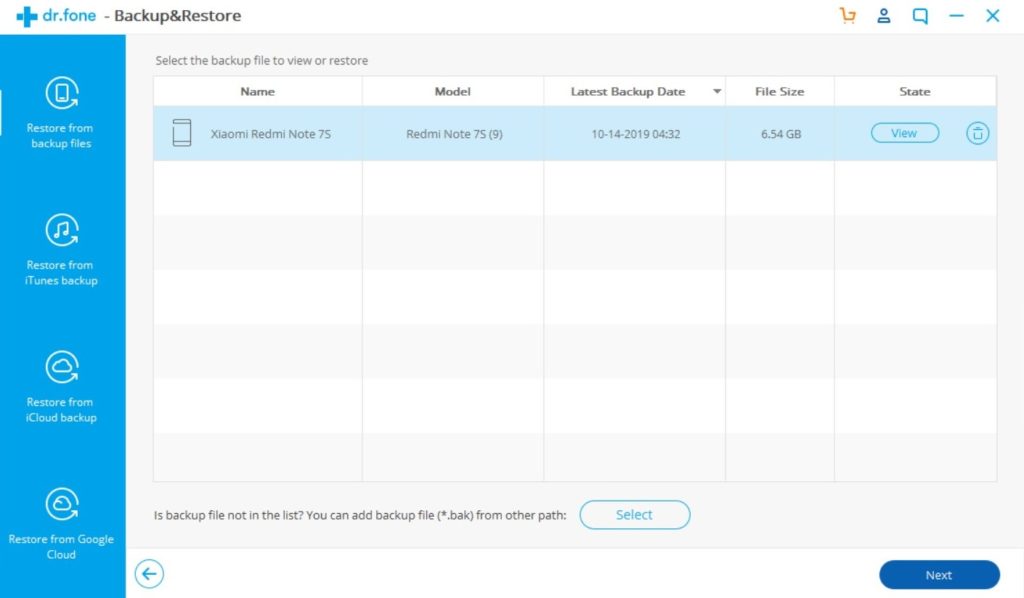
Step 2 – Choose the backup files to want to restore
Now click on “Restore” the Android Backup & Restore Software will the show all the backed up data and files on your computer, simply now click and select the file you want and press View next to it.
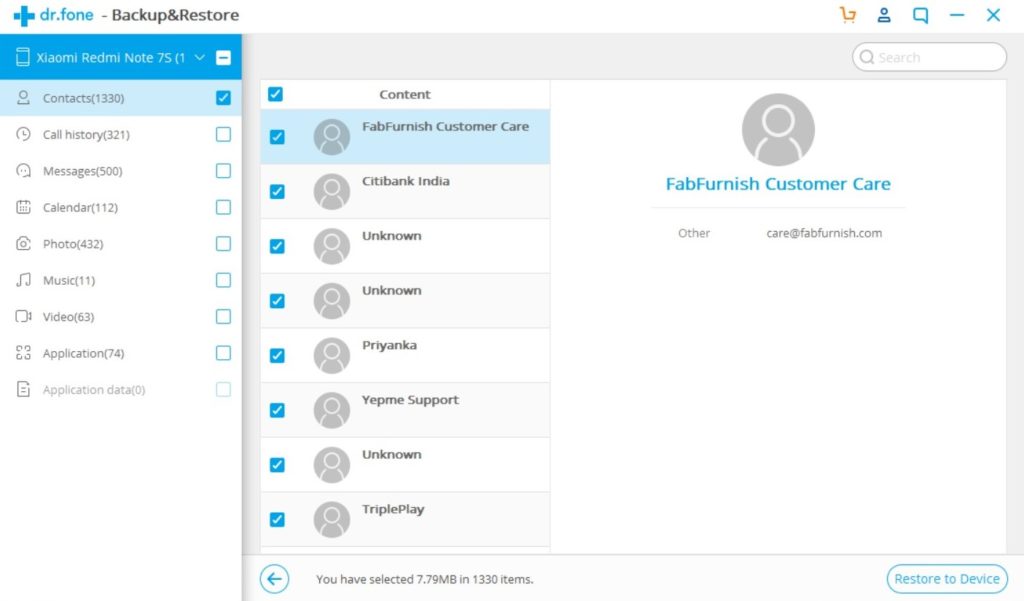
Step 3 – Select and restore the files back to your Redmi 7/7A, Redmi Note 7/ 7S/ 7 Pro
Here you select the files you need, in preview of backup files, just select then press on restore to begin the restore process.
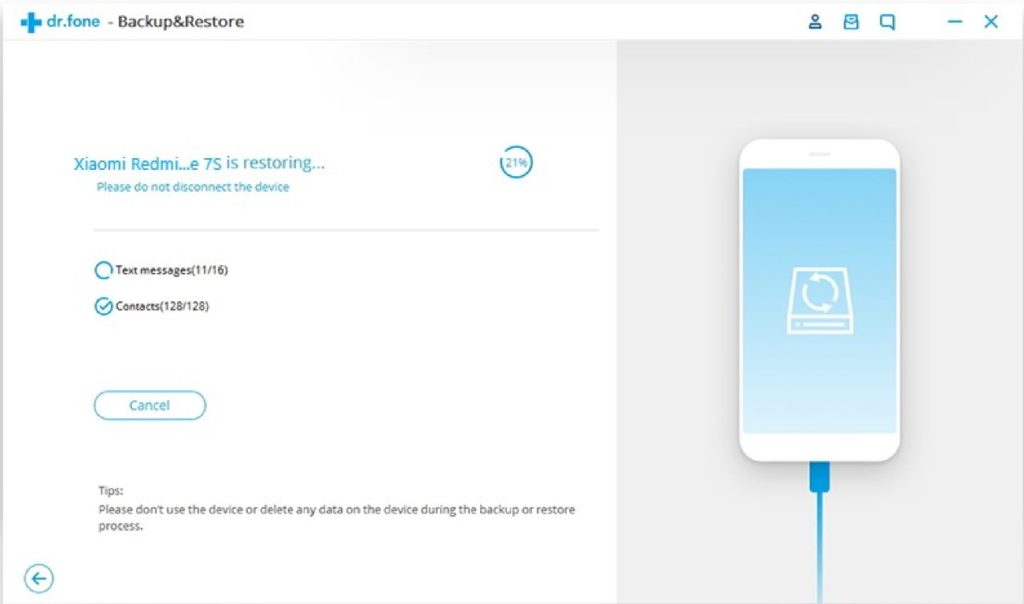
The complete restore process just takes few minutes, please make sure while the process is on you do not disconnect your phone or use it.

Also Read- How To Recover Deleted/Lost Data From Redmi K20/ K20 Pro
| |
Bonus Tip:
Know How To Recover Deleted Data on Redmi 7/7A, Redmi Note 7/ 7S/ 7 Pro When You Have No Backup.
In situation where you accidentally delete important data on Redmi 7/7A, Redmi Note 7/ 7S/ 7 Pro and you have no backup what to do? In such situation you can recover data from Redmi 7/7A, Redmi Note 7/ 7S/ 7 Pro with help of Android Data Recovery Software.
Android Data Recovery Software for Redmi 7/7A, Redmi Note 7/ 7S/ 7 Pro can recover deleted photos, videos, messages, contacts, WhatsApp chat history, call history, audio, notes, voice memos, documents and much more.
Here you can learn step by step complete tutorials how to use Android Data Recovery Software to retrieve deleted data from your Redmi 7/7A, Redmi Note 7/ 7S/ 7 Pro.
Wrap Up
Above we have explained the best ways, how you can backup and restore your Redmi 7/7A, Redmi Note 7/ 7S/ 7 Pro and when you have accidentally lost data and have no backup, how you can recover the lost data from Redmi 7/7A, Redmi Note 7/ 7S/ 7 Pro.
You can choose to use what solution suits you best, but would recommend use Android Backup and Restore Software; because it’s very easy to use and its backs up almost all types of files and data and is 100% secure.
Hope this article was helpful, will be back with more such article and guide, if this helped you please share it so that others can also benefit from it.
Like & follow us on Facebook & Twitter, ask if have any questions click on Contact Us link at end of page and send us your query, we will help in best possible we can.