Are you getting an error notification “Google Play Store has stopped” when opening the Play store app? Play Store app is crashing every time you open it and show this message. Don’t worry! Read along we have prepared this comprehensive article with effective solutions that will help you fix this issue.
You should follow the troubleshooting solutions in order. First, a few simple solutions should be effective and fix the errors Google Play Store has stopped or Unfortunately Google Play service has stopped on your phone. If the simple solutions don’t work move on to the next troubleshooting solution.
What Causes Google Play Store Has Stopped the Issue?
Almost all app crash is the result of a bad network connection, some bug in the software, or some app files getting corrupted. The Play Store is a hard-wired app on every Android smartphone but like any other app, this app too can crash at the same time it also can be fixed.
So, let’s start fixing the “Google Play Store has stopped” issue starting with easy and quick solutions and moving to complex solutions if the issue persists.
1. Restart Your Android Device
You most probably would have tried this fix already, if not then restart your phone. Restarting your device resets all connections and fixes Play Store issues most of the time.
Steps To Restart/Reboot Your Android Phone:
- Long press the Power Button on your phone.
- When options appear select the Restart/Reboot option.

Now, wait until your device will shut down and automatically turn on fixing all connection issues. Open Play Store and check now if yet it shows the error “Google Play Store has stopped”. Try the next fix.
Also Read: YouTube Music Keeps Pausing? Here Is The Real Fix!
2. Change Internet Connection
A spotty internet connection also causes Google Play Store has stopped errors on your phone. Slow internet dropping connections while operation can be fixed by changing internet connection.
If you are using cellular/mobile internet change your connection to a Wi-Fi network. If connected with Wi-Fi, connect with your cellular/mobile internet. Then open Play Store and check. If yet the issue persists don’t lose hope. Try the next solution.
3. Clear Google Play Store Cache And Data
Errors Google Play Store has stopped or Unfortunately, Google Play service has stopped appears when there is an issue with the Play Store app. You can fix this by clearing the data and cache of the Play Store app.
Steps To Clear Play Store App Data And Cache:
- Open Settings.
- Navigate and go to Apps.
![]()
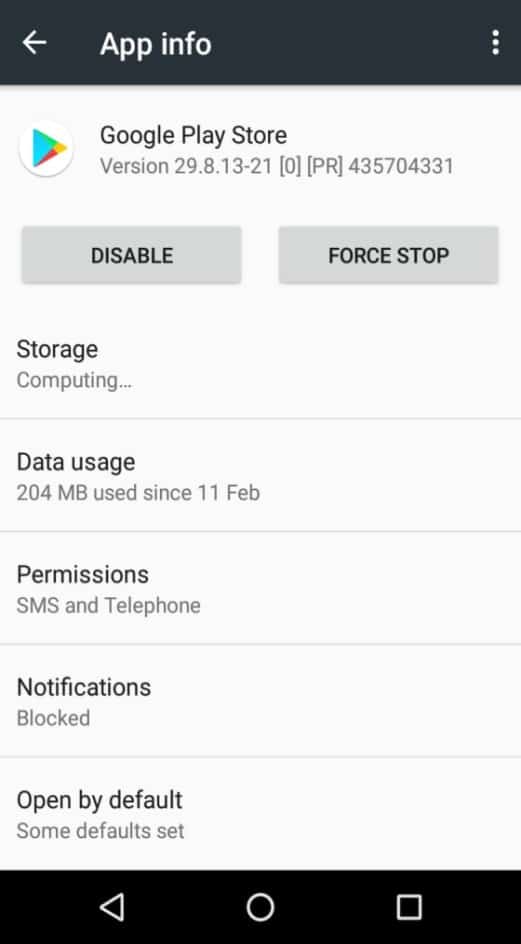
- From all apps select and open the Play Store.
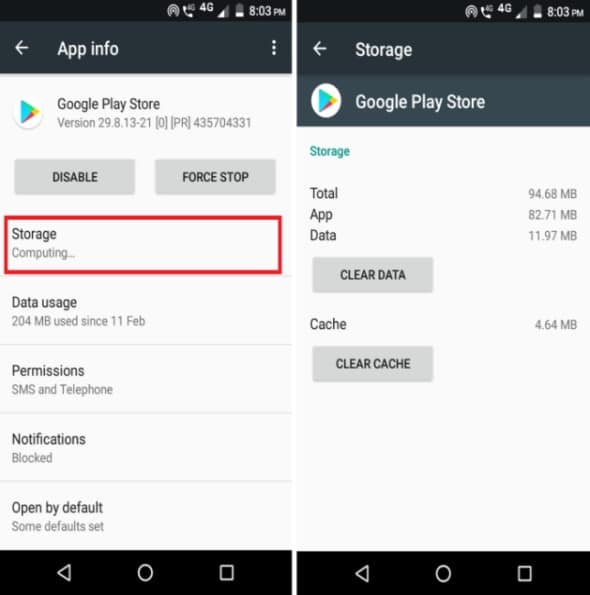
- Tap and open Storage.
- Now tap and Clear cache and Clear Data
Also Read: Fix Call Of Duty Mobile Log In Issue Due To Authorization Error
4. Disable and Enable Google Play Store App
Disabling and enabling apps on Android can be effective in some scenarios to fix the “Google Play Store has stopped” issue. If the above troubleshooting did not fix the issue try this.
Steps to Disable and Enable Google Play store app:
Step 1 – Open Settings.
Step 2- Navigate and go to Apps.
Step 3 – From all apps select and open the Play Store.
Step 4 – Tap on Disable tab and disable the app. You will see a pop message saying that “app may not function the way it should” ignore it.
Now Restart the phone and open the Play Store to see if it’s working.
Also read: How To Fix “Moisture Detected” Error on Samsung Galaxy
5. Uninstall Google Play Store Updates
You should try this solution only if you encounter the “Google Play Store has stopped” error after a recent app update. Before updating, if your Play Store was working fine, you should definitely try this fix.
The steps are simple:
Step 1 – Open Settings.
Step 2 – Navigate and go to Apps then Manage apps on some device.
Step 3 – From all apps select and open the Play Store.
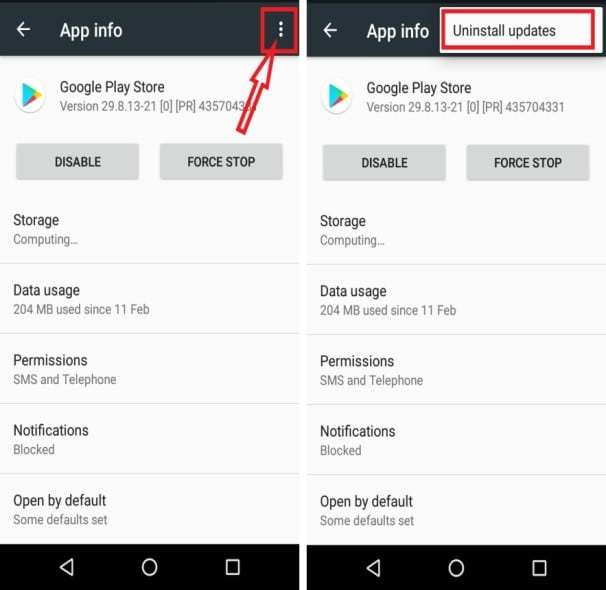
Step 4 – Tap on Uninstall updates, on some Android you may not see the uninstall updates. Tap on three dots located at the top right corner and there find Uninstall updates.
Also Read: How To Hide Photos On Samsung Without Using Any App
6. Reset App Preferences
Resetting App Preferences will reset all the installed apps to their default value and if you have disabled any apps all will be enabled. Don’t worry you will not lose any data. So, give this fix a try.
Steps to reset app preference on Android:
Step 1 – Open your Android device Settings.
Step 2 – Tap and open Apps and notifications.
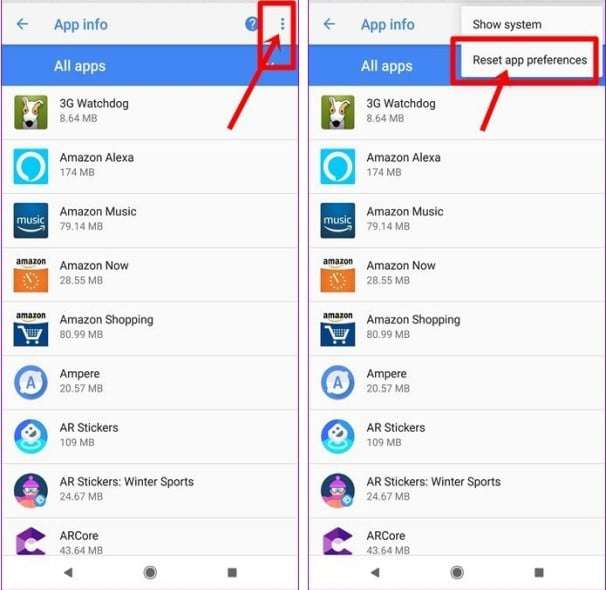
Step 3 – Select View all apps.

Step 4 – Tap on the three-dot located at the top right corner of your phone’s screen.
Step 5 – Select Reset app preferences.
Also Read: How Do I Recover Permanently Deleted Photos From Android
7. Try Android System Repair Tool
Android System Repair is a Windows Computer Application that you can use to fix Android phone’s system-related issues. This Android System Repair helps fix apps crash issues and other errors like black screen android not able to switch on etc. First, download and install the Android System Repair on your computer. from the link below.
Important Note: Using Android System Repair to fix Google Play Store has stopped errors that may erase all your data on your phone and reset your phone. So, backup all your important data on the phone then perform system repair using this tool.
 |  |
Step 1. Connect your Android Device to your computer
Download & launch Android Repair software on your computer and select “System Repair”

Now connect your Android device to your computer via USB cable & click on “Android Repair”

You will now get device information window, here select the correct brand, name, model, country/region, ad carrier details. Then confirm the warning and click ‘Next’.

In the repair process, the Android repair might erase all data on your Android device. Type in “000000” to confirm to proceed further.

Important: Make sure you Back Up your Android device data before you start to repair your Android device.
Step 2. Boot your Android device in Download mode.
Now before you begin the android repair, it’s compulsory to boot your Android device in Download mode. Carefully follow the instruction given below to boot your Android phone in Device firmware update mode.
Steps for Android phone & tablet with Home button:
- Switch off your Android device.
- Now, press and hold the “Volume Down+ Home+ Power buttons” for 5 to 10 seconds.
- Release all the buttons and then press the ‘Volume Up’ button to enter Download Mode

Steps for Android phones & tablets with no home button:
- Switch off your Android device.
- Now, press and hold the “Volume Down+ Bixby+ Power buttons” for 5 to 10 seconds.
- Release all the buttons and then press the ‘Volume Up’ button to enter Download mode.

Now click ‘Next’ the Android Repair program will start downloading the firmware.

Now after the download completes and the firmware is verified, the program automatically begins to repair your Android device.

Within minutes, your Android device’s all system issues get fixed back to normal.

8. Factory Reset Your Android Device
Important Note – If you chose to factory reset this will delete all data on your phone, including downloaded apps, images, texts, and other files. If you go with this method, make a backup of your Android phone data first.
Also Read: How To Backup and Restore Samsung Galaxy Phone Data
Performing a factory reset will return your phone to its factory settings. This means it will go back to the state when you bought the phone. Factory reset will reset to the old version of the Play Store and other apps, which will almost probably resolve your problem.
To reset your device, connect it to a power source and then perform the following steps:
Step 1- Open Settings.
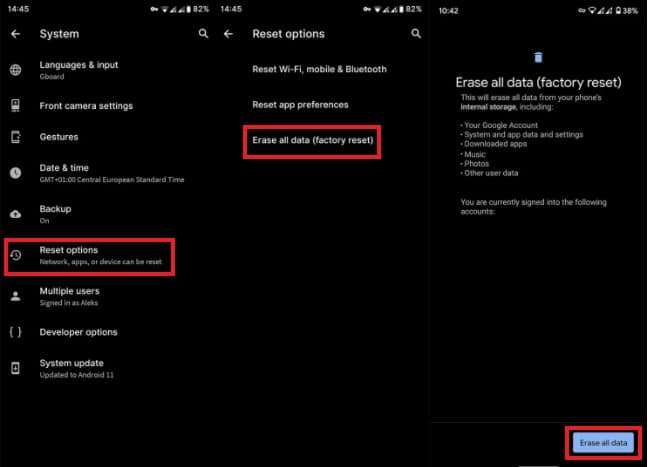
Step 2 – Go to System
Step 3 – Tap and select Reset options.
Step 4 – Select Erase all data (factory reset).
Step 5 – Tap Erase all data tab.
Now your phone will reset and restart and go to the setup screen. Log in with your Gmail and reset your phone.
You May Also Like:
- Samsung Screen Broken? Here How To Unlock!
- How To Unlock Tablet Pattern Lock If Forgotten
- Snapchat Not Working? Here’s How To Fix It
- Samsung Galaxy A52/A51/A42/A32 Battery Draining So Fast? Here How To Fix!
Conclusion
Here we come to the end of this article. Thanks for following the solutions we recommended in this article. We hope the solutions fixed the issue. Make sure you check out our Twitter page to find more troubleshooting articles like this.

![How To Fix Can’t Connect To Camera Error On Android [10 Best Ways]](https://androidphone-recovery.com/wp-content/uploads/2021/01/how-to-fix-cant-connect-to-camera-error-on-android-1024x574.jpg)