No smartphone user would like to delete one’s favorite videos, photos on their phone to make space to save new memories. After long use every smartphone user face dilemma when their smartphone’s storage space is almost full. That what should they delete in order to free storage space without deleting data?
Videos recorded in 4k, those quality photos, favorite songs, and favorite games all quickly eat up all the storage space available. Especially on smartphones like OnePlus Nord that don’t have external memory support. Though OnePlus Nord comes with 64GB/ 128Gb/ 256GB its quickly gets filled up.
What to do when you don’t want to delete the data on your phone forever. The best option is to backup data from your OnePlus to computer storage or to an external hard drive. You can also backup data by uploading data to cloud storage.
The need for more available storage space is not that much of a concern for regular users. For some users, 128GB/256GB would a more than sufficient. But there are chances of accidental deletion, unfortunately, your OnePlus Nord can get damaged, stolen, or lost. This could result in the loss of all data on your OnePlus Nord.
So, to secure those memorable memories and other important data on your OnePlus Nord, every user should inhabit to back up data.
In short, if you want to keep your data safe and secure forever you should back data on your phone as frequently as you can. In this article, we will discuss 3 different methods using which you can back up data on your OnePlus Nord.
The backup method which we are going to discuss will help OnePlus Nord users backup data such as Photos, Videos, Call History, Contacts, Messages, Voice Memos and Documents, Notes, and other data from OnePlus Nord to PC and cloud.
Method 1- How to Backup and Restore OnePlus Nord Data with OnePlus Switch
OnePlus Switch is a Utility App that is available on all OnePlus smartphones used to switch data between devices, and it can also be used to backup and restore data on OnePlus smartphones data. Let’s check out set-by-step how to backup OnePlus Nord using the OnePlus Switch App.
Step 1- Connect your OnePlus Nord to the internet, you can use your mobile network, it’s recommended to use Wi-Fi if available. Then open the OnePlus Switch App.
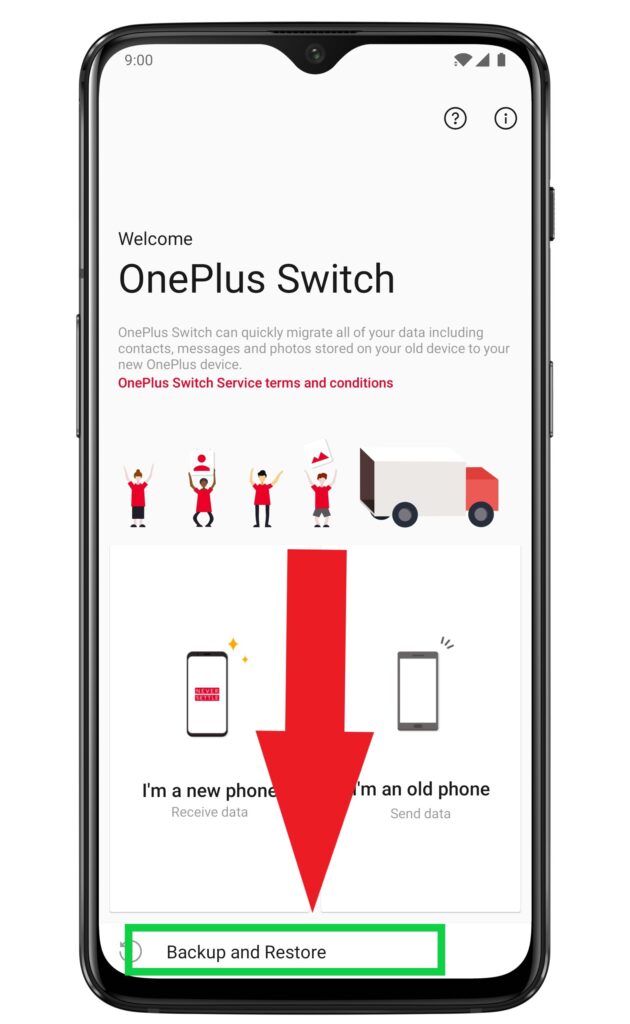
Step 2- Tap on Backup and Restore, here two options are available New Back and Restore Backup.

Step 3- Tap New Backup, here you can see the types of data you can backup, you can backup Contacts, call logs, photos, videos, apps, audio etc. Select all or select the data you want to backup. After selecting click Backup now.


Step 4- When the backup is complete you can check it in the phone’s storage under the Mobile backup file. To navigate there go to File Manager>Storage>opbackup>Mobilebackup here you can see all backup data. If you are going to Factory Reset your OnePlus Nord, you should first copy the Mobile backup folder to the Computer so that you can restore it after reset. To restore follow the steps below.
How to restore the Backup data created from the OnePlus Switch app?
If you have copied the OnePlus Nord backup and saved it on your computer and performed a factory reset, then to restore follow Step 1 and then Step 2. If you just want to restore your OnePlus Nord from backup then just follow Step 2.
Step 1: Connect your OnePlus Nord to your computer on which your you have saved your Backup folder from OnePlus, now simply transfer that backup folder back to your OnePlus Nord, make sure you transfer it back to the same location where you copied it from, that is in Internal Storage/Backup/Mobile Backup.
Step 2: Open OnePlus Switch, choose “Backup and Restore” then tap on “Restore Backup” then select the files you want to restore and then Tap “Start Restoration”. The OnePlus Switch will restore all your selected files.
Method 2- How to Backup and Restore OnePlus Nord Data Using Google Cloud services
Alternately you can also use the Google Photos app to back up photos and videos on your OnePlus Nord. You can backup documents and other files to Google’s Drive App. Google provides 15 Gb of combined space per id so use free storage wisely.
Steps to back data from the OnePlus device to Google cloud.

Method 3- Backup and Restore OnePlus Nord Data to PC. [ Quickest way with help of Android Backup & Restore Software]
First Download and Install Android Backup & Restore Software on your computer, download from the links given on this page. Follow step by step complete tutorials on, how to use OnePlus Nord Data Backup & Restore tool. How It works and helps users to backup and restore data from OnePlus Nord Phones.
Section 1: How to Back up OnePlus Nord Data to PC
Section 2: How to restore OnePlus Nord with backup up data
 |  |
Steps To Backup OnePlus Nord Data To PC
Step 1- Connect your OnePlus Nord to Computer
Launch Android Data Backup and Restore software on your computer (PC or Laptop) and select the “Backup & Restore” option.

Use a USB cable to connect your Android phone to your computer. Make sure you have enabled USB debugging on your Android phone. When your android device is detected on your computer you will get a pop-up asking you to allow USB Debugging.
Now when your OnePlus Nord is connected to your PC, simply click on Backup to start the Android Phone data backup.

In case you have used the software before and backed up the Android data, then you can click on “View backup history” and view past backup.
Also Read: How To Recover Deleted/Lost Data From OnePlus Nord
Step 2 – Choose types of files to up
Once your OnePlus Nord gets connected with Computer, choose the types of files you wish to backup, the software is programmed to automatically check all the types of files for you. Now just press on “Backup” to begin the process.

During the backup process do not disconnect the OnePlus Nord; don’t use your OnePlus Nord or delete any file while the backup process is in progress.

Once the complete backup is done, you can press the “view the backup” option to see all the files that have been backed up.

Steps To Restore Backed-up To Back To Your OnePlus Nord
Step 1 – Connect your OnePlus Nord to Computer
Launch Android Data Backup and Restore software on your computer (PC or Laptop), then in tools select “Backup and Restore” use a USB cable to connect your OnePlus Nord phone to your computer.

Step 2 – Choose the backup files to want to restore
Now click on “Restore” the Android Backup & Restore Software will show all the backed up data and files on your computer, simply now click and select the file you want and press View next to it.

Step 3 – Select and restore the files back to your OnePlus Nord
Here you select the files you need, in a preview of backup files, just select then press on restore to begin the restore process.

The complete restore process just takes few minutes, please make sure while the process is on you do not disconnect your OnePlus Nord or use it.

| |
Conclusion
In my opinion, these were the three best methods using which every OnePlus Nord user can backup and secure their data. To back up your OnePlus Nord data to the computer it is recommended you use Android Backup and Restore. Just one click and all your data get backed. Moreover, you can restore all the data whenever you need it within minutes. Please share your experience and opinion on our Facebook page.