Summary: Its an extensive guide. Learn about the most common Facebook related issues and how to resolve them. Also know about features available on Facebook and how to use them to secure your Facebook account and hide your personal information from public view.
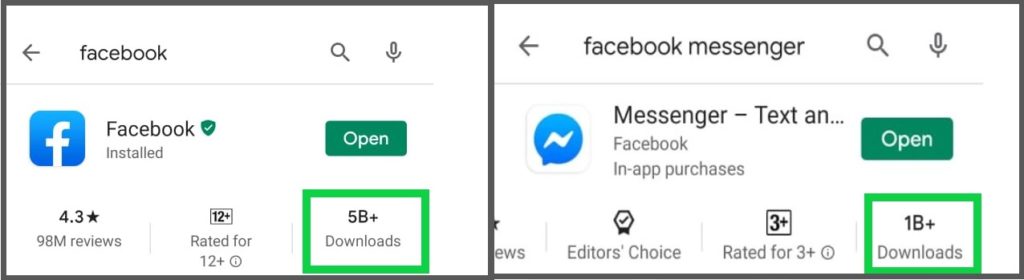
Facebook one of the most popular social network around the world. Last time I checked the number of downloads of Facebook App was, Plus 5 Billion. That’s a huge number of people. At time I wrote this article, according to the world population clock it was approx. 7.8 Billion in world population.
So, according to these number, more than 64 percent of world population in on Facebook, and out of those 5 Billion Facebook users more than 1 billion people use Facebook messenger to communicate with each other.
A lot have changed since the Facebook was launched, in course of time lots of features have been added to make Facebook more secure for users. Yet it totally depends upon Facebook users how they use it.
In this article we have tried to cover all the important features that all Facebook users should be aware of , so that you use Facebook safely. Below I have listed the 10 most common issues in this article. You can click on the one you are interested in, to know how to fix it.
Part 2- How to avoid getting tagged with unwanted posts on Facebook?
Part 3- How to review tagged post and remove tag from Facebook post?
Part 4- How to make sure your Facebook account is secure?
Part 5- How to get alert when your Facebook account is logged in on a new device?
Part 6- How to block and unblock someone on Facebook?
Part 7- How to Download all Photos and videos you have on Facebook?
Part 8- How to update/ add new email and phone number on Facebook?
Part 9- How to recover deleted Facebook Messenger chats deleted by sender?
Part 10- How to recover deleted photos and videos downloaded from Facebook?
Part 1- How to hide your sensitive information, photos and post on Facebook from public view
When you open a Facebook account you use your Cellphone Number, Email id, Date of Birth these are personal information which everyone would not like to share with whole world.
If you just open Facebook account and use it in default settings, all your information are visible to everyone who looks into your Facebook profile. Like your phone number, your email id, DOB. So, how to hide those info? To know how follow the steps below.
Note- All the important areas where you need to tap are highlighted in read box.
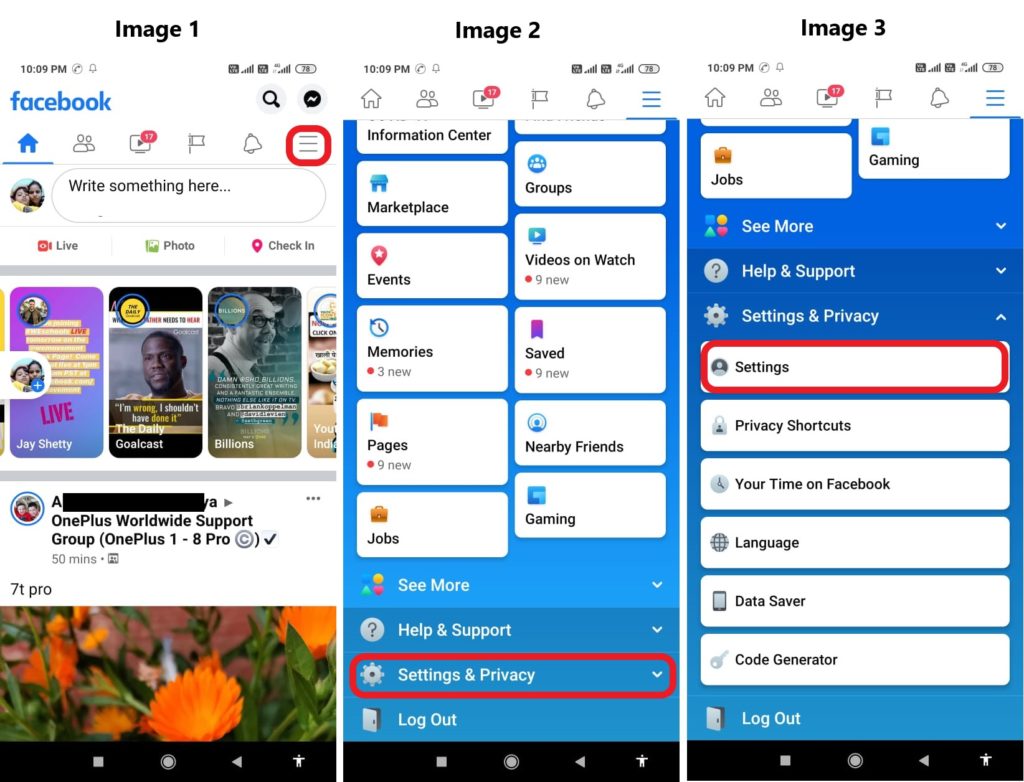
Step 1- Log in to your Facebook Account, Click on three small horizontal lines shown on upper Right side of your Facebook App [See IMAGE 1] to go to Settings Page.
Step 2- Scroll and tap on “Settings & Privacy” a drop menu will open in that select “Privacy Shortcut”.
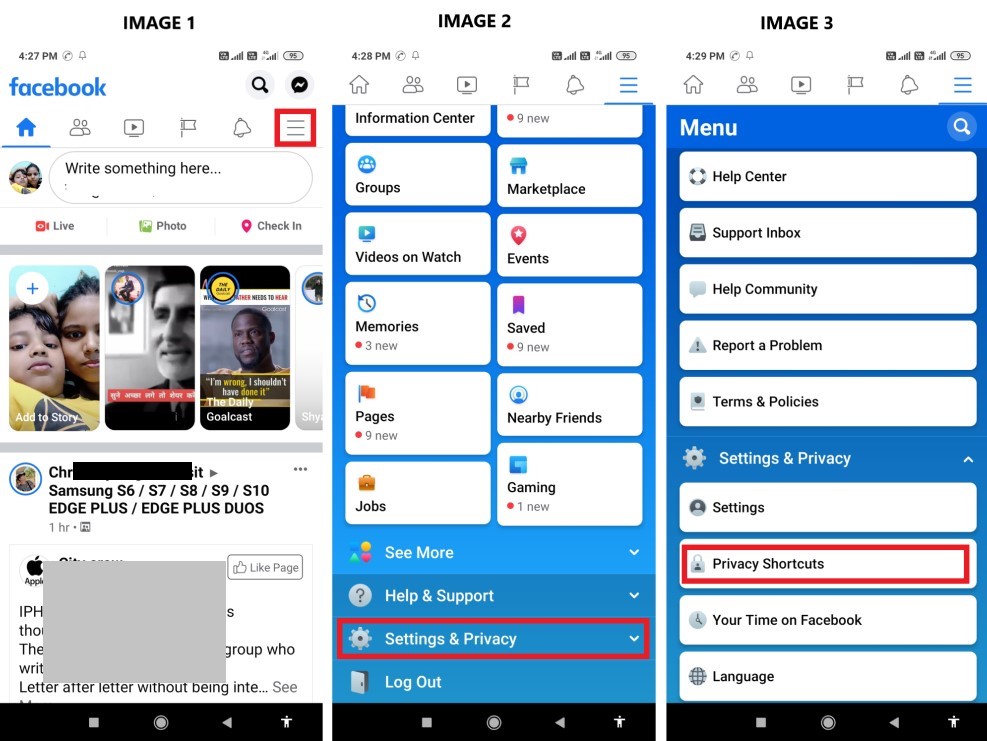
Step 3- On next page Tap on option “Review a few important privacy settings.” Now on next page you can see 4 options. To hide your Phone number, Email id, DOB, Address, Your Friend list on Facebook, Tap on option one “Who can see what you share.” and then to go ahead tap “Continue.”
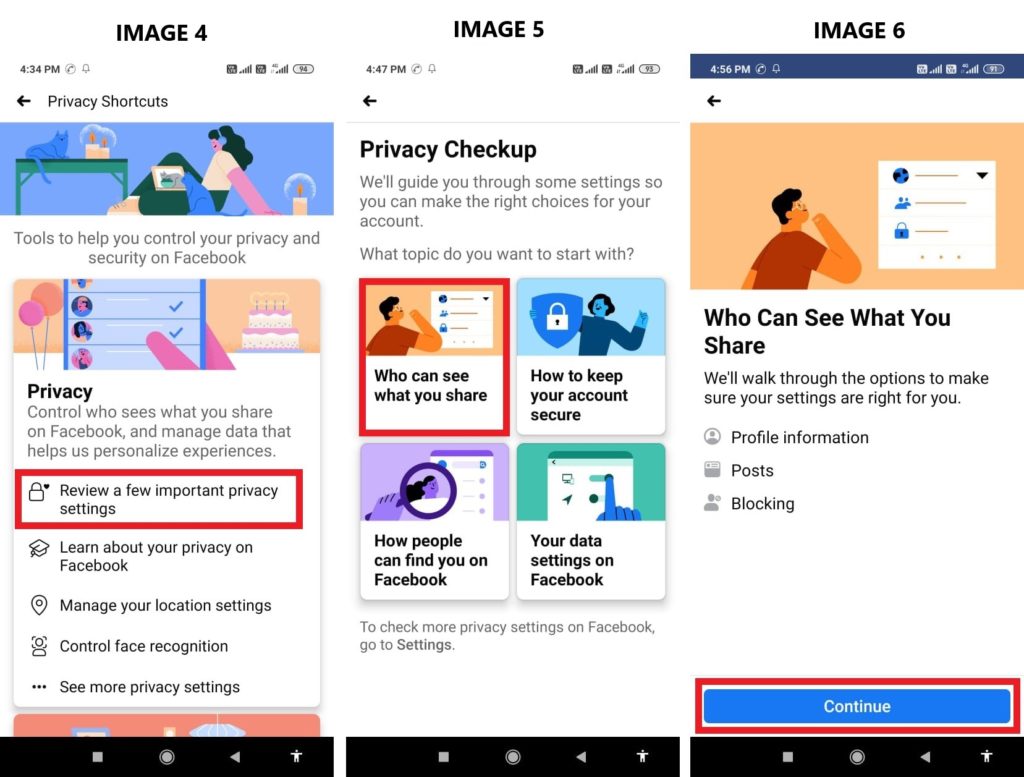
Step 4- After you tap continue, on next page you can see your Profile information, and in front of ever information you can see a tab. By default its all set Public, here you get options to set audience who can view your information, “Public” means anyone on or off Facebook can see that information.“Friends” means only people in your friend list can view that information. “Only me” select this if you want to hide that information from everyone on Facebook even your friends wont be able to see the info that’s under “Only Me.”

Step 5- One by one go to each information and according to your choice select what you want to share with Friends what you want to Hide, to hide a information select “Only me.” After you have made changes Tap on Next.
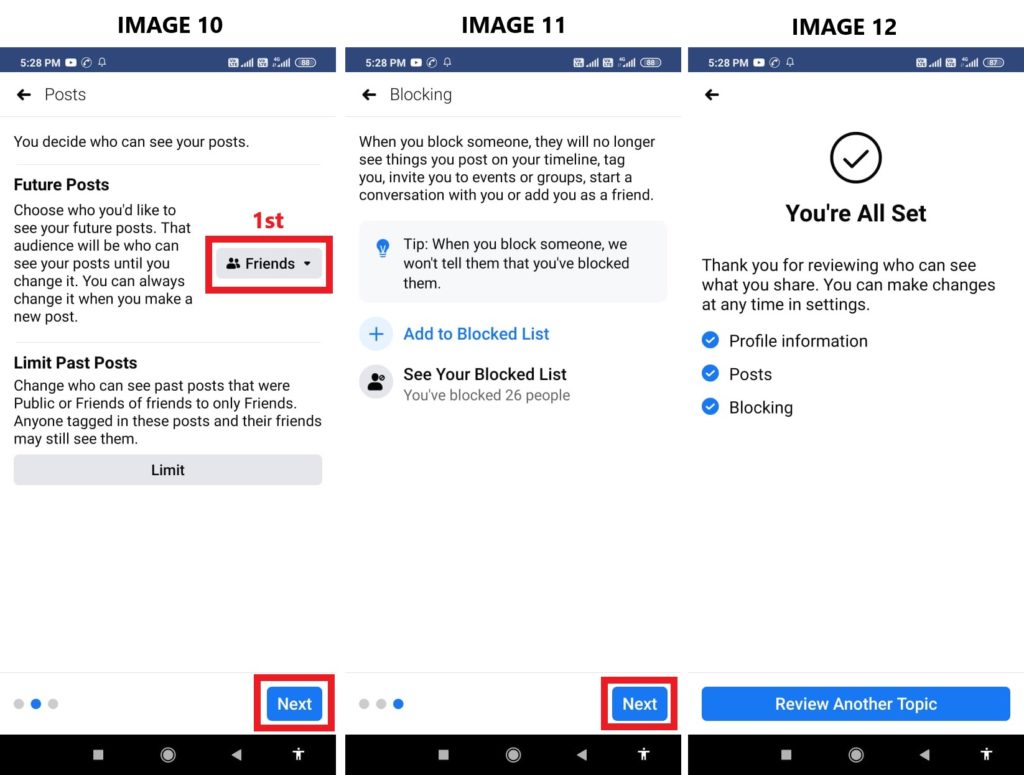
Step 6- Now here on this page you can choose who can see your Facebook Posts, here you should change it from Public to Friends. Tap “Next” and it will take you to block list, just Tap “Next” again and you are all set. All info now you changed audience to “Only Me” are now hidden from everyone.
Part 2- How to avoid getting tagged with unwanted posts on Facebook
Are you annoyed by unwanted irrelevant and embarrassing post, on your timeline that are posted by your Facebook friends with your name tagged with it. Now you don’t have to worry people can tag you, but it will not show on your timeline until you review and allow it to be visible on your timeline. Follow the instructions below and to know how to set up tagging review.
Note- All the important areas where you need to tap are highlighted in read box.
Step 1- Log in to your Facebook Account, Click on three small horizontal lines shown on upper Right side of your Facebook App [See Image 1] to go to Settings Page.
Step 2- Scroll and tap on “Settings & Privacy” [See Image 2]a drop menu will open in that select “Settings” [See Image 3].
Step 3- On settings page scroll down and tap on Timeline and Tagging” [See Image 4]. Now first thing you should do is change the audience of post that are posted by others on your timeline,[See Image 5] tap on it and change it to “Only me”. By doing this only you will see what others post on your timeline. Now go back to Timeline and Tagging page by tapping on your phone’s back button.
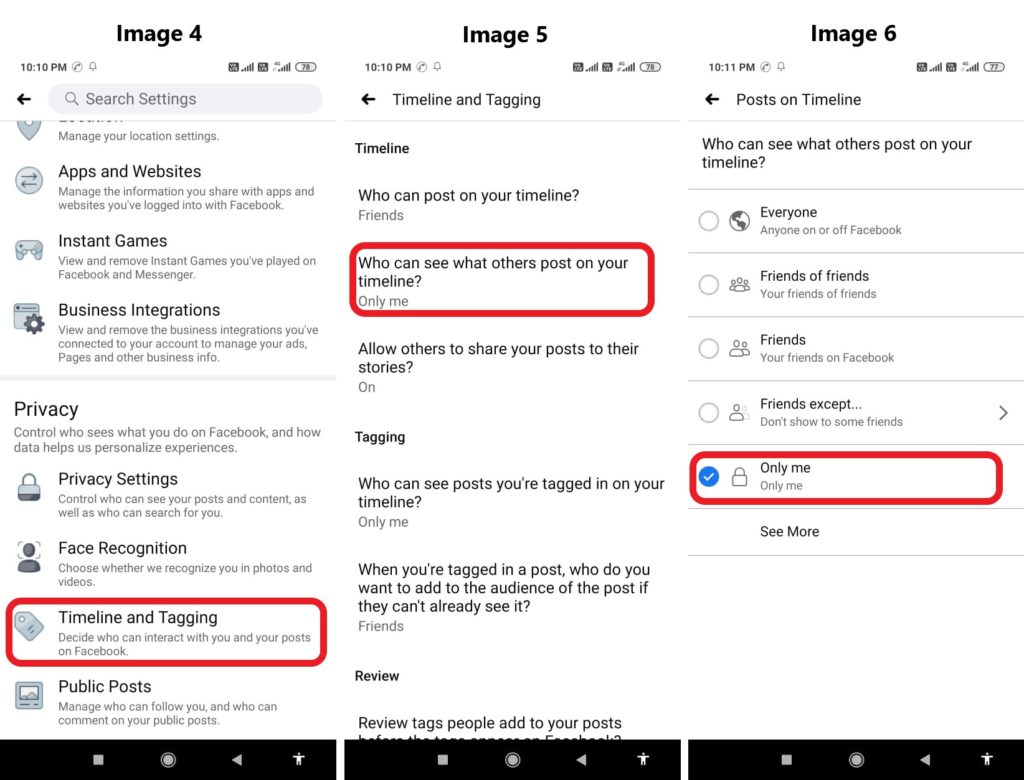
Step 4- Once you are back on Timeline and Tagging page Scroll and go to “Tagging” under that there are 2 options, one by one tap on both and change its audience to “Only me”. See image below for reference. I have already changed it to “Only me” long time ago, that’s why in image below its showing Only me, by default the audience is set to “Everyone” so, check and change it.
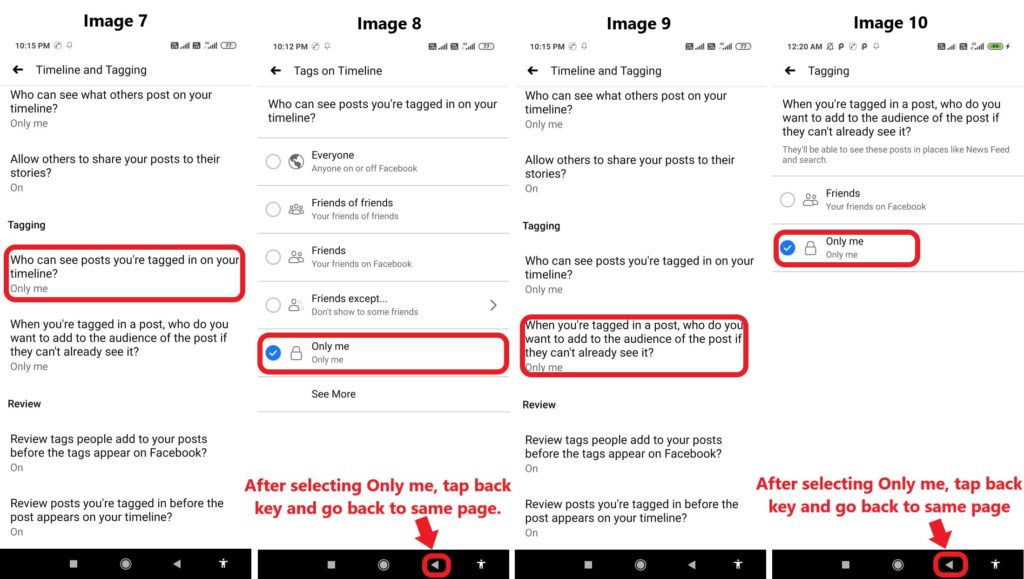
Step 4- Now back on same page of Timeline and Tagging, Scroll and go to end of the page under Review here too are two options both by default is “Off”. Tap on both one by one and toggle and switch Tag review “On” for both options. See image below for reference.
Note- To go back yon can also tap on small arrow on showing on Facebook App top left side, or use phone’s back button, on my Device the back key on the right side, on many device by default its on left side so tap accordingly.

Now tap on the second option under Review, on next page toggle and switch Tag review “On”. See image below for reference.
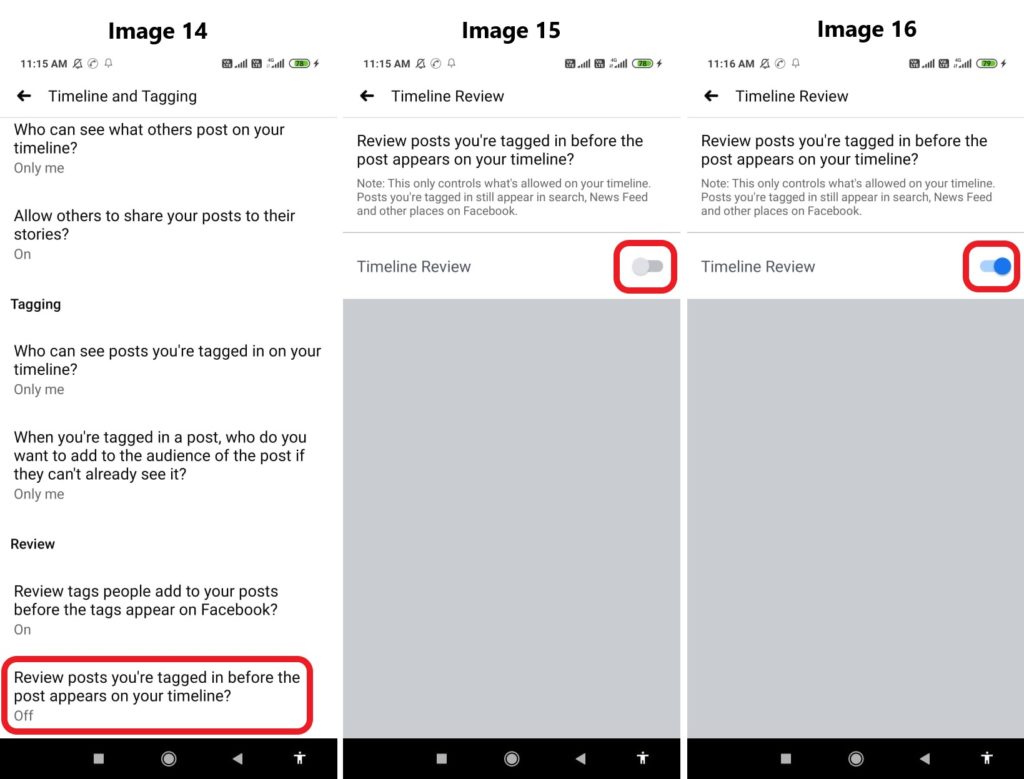
Finally you are done. Now if anyone tag you with any post you will receive a notification to review that post, if you want to allow it to be visible on your timeline its your choice, if you don’t like that post you are tagged with you get option to hide it just click on “Hide.”
Watch Screen recording showing how to enable Tagging Review. If you like it subscribe this channel on YouTube.
Video Source: Wise Androidian
You can also ignore the tagged post notification and review it later too, to review all pending tagged post later. Follow the steps given below and check image for reference.
Part 3- How to review tagged post and remove tag from Facebook post
Note- All the important areas where you need to tap are highlighted in read box.
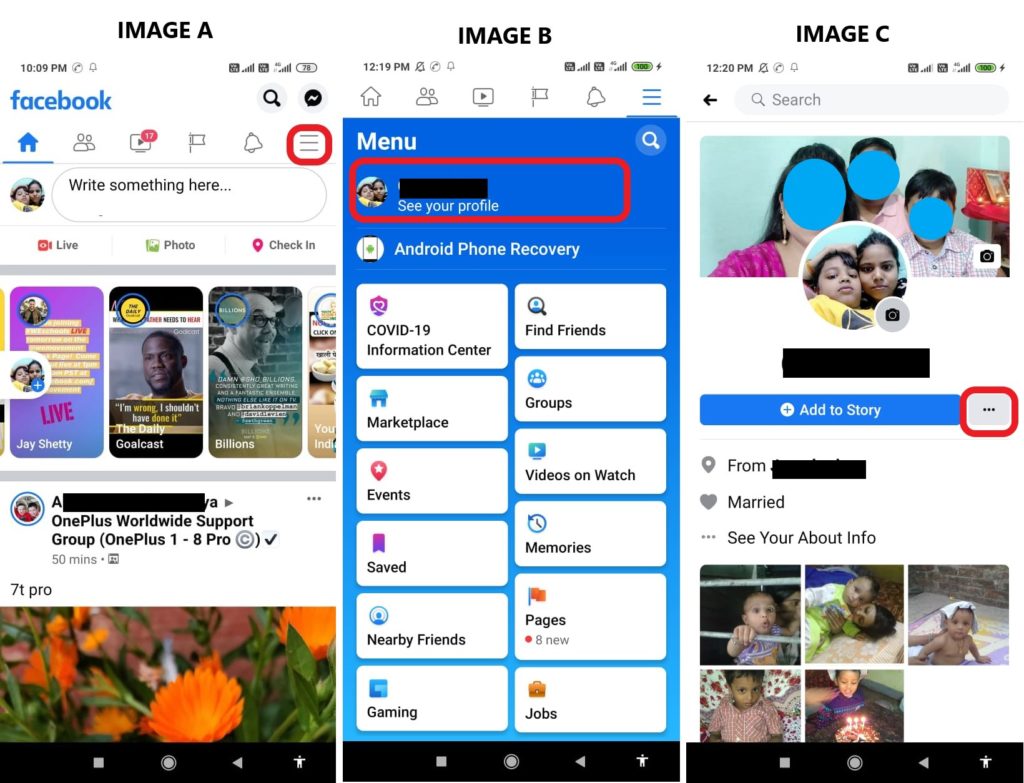
Step 1- Go to your Facebook Profile page, then on your profile page tap on the 3 dots showing beside Add to story. [See IMAGE C]
Step 2- After you tap on 3 dots it will take to to Profile Settings page there find and tap on “Timeline Review” [See Image D] and you can see all your tagged posts that you have not reviewed. Below each post you can see two options “HIDE” and “ADD TO TIMELINE.” [See Image E]
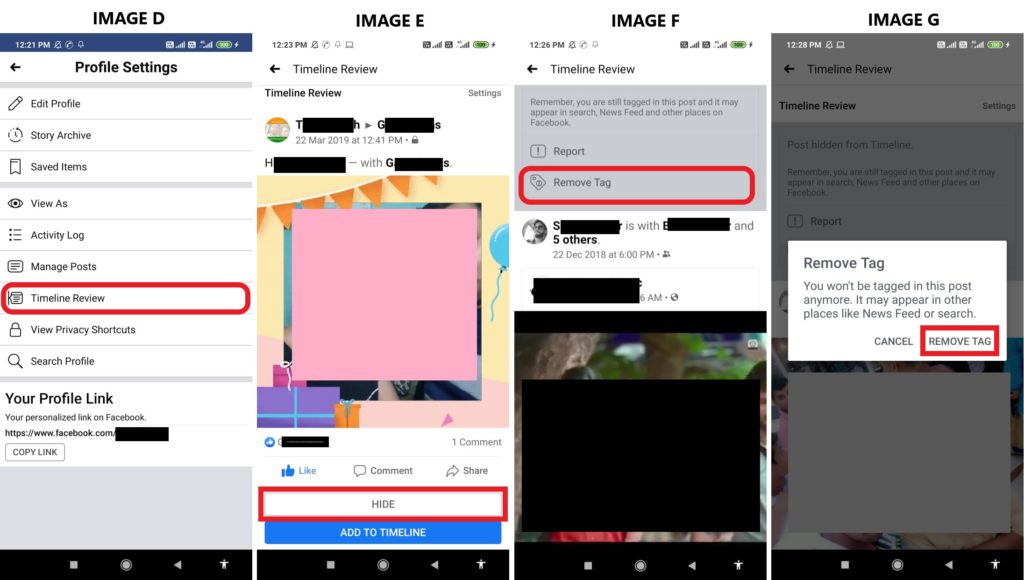
Step 3- Now the post you don’t want to be tagged with tap on “HIDE” then when option appears tap on “Remove Tag” here you also get option to “Report” the post if you feel, its inappropriate post that need to be reported or just tap on “Remove Tag” and when pop up asks to confirm tap on “REMOVE TAG” and you are done Tag will be removed and that post will disappear from timeline review.
Part 4- How to make sure your Facebook account is secure
Sometimes its happens that you have some issue with your smartphone and you send it for repair. Then for time being you use your backup phone or use someone else’s device to log in to use Facebook. But you use it and now you are not sure if you logged out from others device or not.
So, how to check that? If your password is compromised and if you are logged on someone else’s device. Someone is logged into your Facebook account, How to know that? How to check where and on how many devices you are logged in with your Facebook account?
Well Facebook keeps records of all your login information what device your are logged in with location, which you can see, review the information and make changes and secure your Facebook account to know how follow the steps below.
Note- All the important areas where you need to tap are highlighted in read box.
Step 1- Log in to your Facebook Account, Click on three small horizontal lines shown on upper Right side of your Facebook App [See Image 1] to go to Settings Page.
Step 2- Scroll and tap on “Settings & Privacy” [See Image 2]a drop menu will open in that select “Settings” [See Image 3].
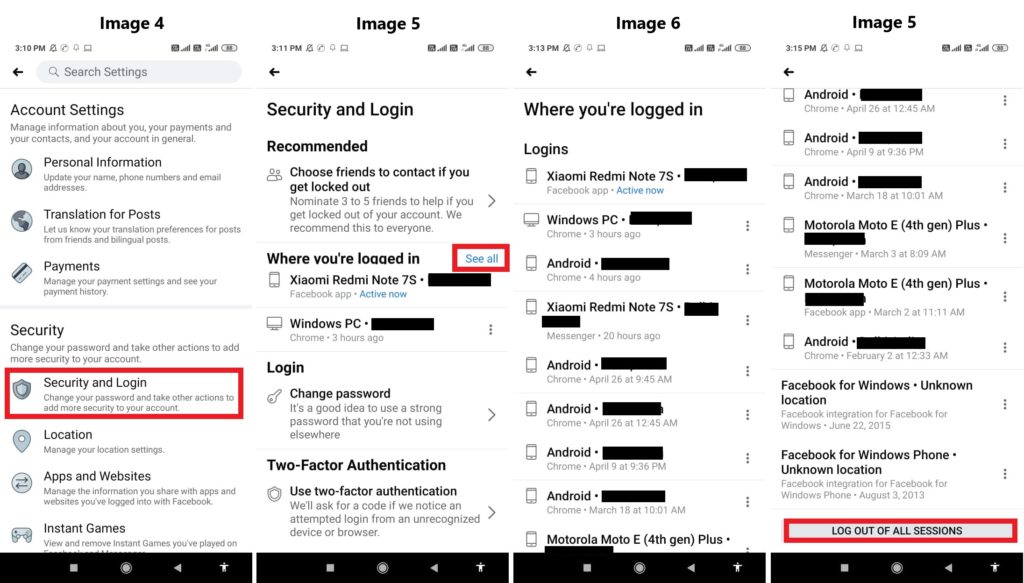
Step 3- After you tap Settings on next page tap on “Security and Login” on Security and login page find “Where you’re logged in” there you can see written “See all” [See Image 5 Below] tap on that and you can see all the device you are and were logged into with device location City and Country in image below. I have hidden the location you can see it as blacked out area.
If you see unknown device or devices and don’t remember or recognize it. You should tap on LOG OUT OF ALL SESSION and then Facebook App will guide you to secure your account.
To secure your Facebook account first Facebook App will ask you to select 3 to 5 trusted friends. So, that in case if you are locked out of your Facebook account, your trusted contacts can send you code and URL from Facebook to help you log back in.
Then it will ask you to change your Facebook Password, it’s recommended you change your Password too and select a strong password. And finally you will be logged out from all other device. So, remember your Password in case you want to log in again on another device like your Laptop/ PC etc.
Part 5- How to get alert when your Facebook account is logged in on a new device
Get alert about unrecognized logins when anyone log in from a new device or browser you usually don’t use. By default this login alert function is disabled, you have to manually enable it. To know how to enable it follow the steps given below.
Note- All the important areas where you need to tap/ click are highlighted in read box.
Step 1- Log in to your Facebook Account, Click on three small horizontal lines shown on upper Right side of your Facebook App [See Image 1] to go to Settings Page.
Step 2- Scroll and tap on “Settings & Privacy” [See Image 2]a drop menu will open in that select “Settings” [See Image 3].
Step 3- After you select Settings on next page select “Security and Login” on Security and login page scroll and find “Setting Up Extra Security” under this you will find “Get alert about unrecognized logins” [See Image 5] select it to go to next page. On the next page you can see 3 options by which you will be alerted. [See Image 6]
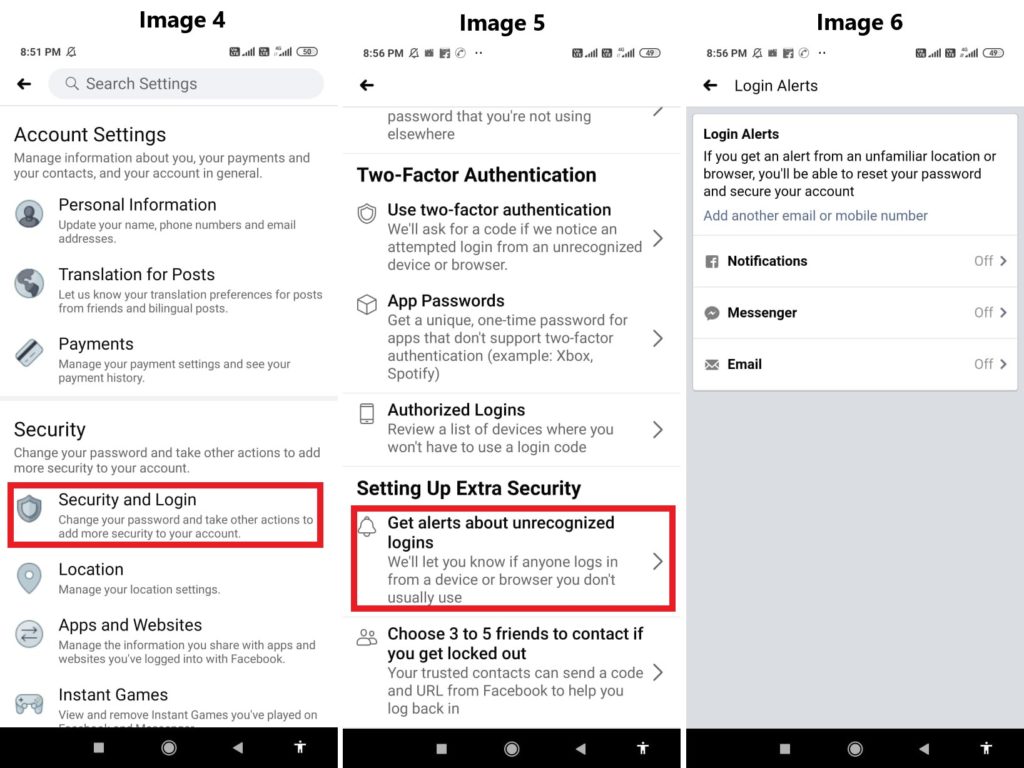
Step 4- Now on Login Alert page you can see 3 type of alerts which are [Below See Image 7] Notification, Messenger and Email, these are 3 ways by which you will be notified about unrecognized logins.
By default its on “Don’t get notification” [Below See Image 8] Now one by one select each one and turn “On” all 3 types of alert. Select “Get notification” and then select “SAVE” to turn alert “ON”. [Below see Image 9]
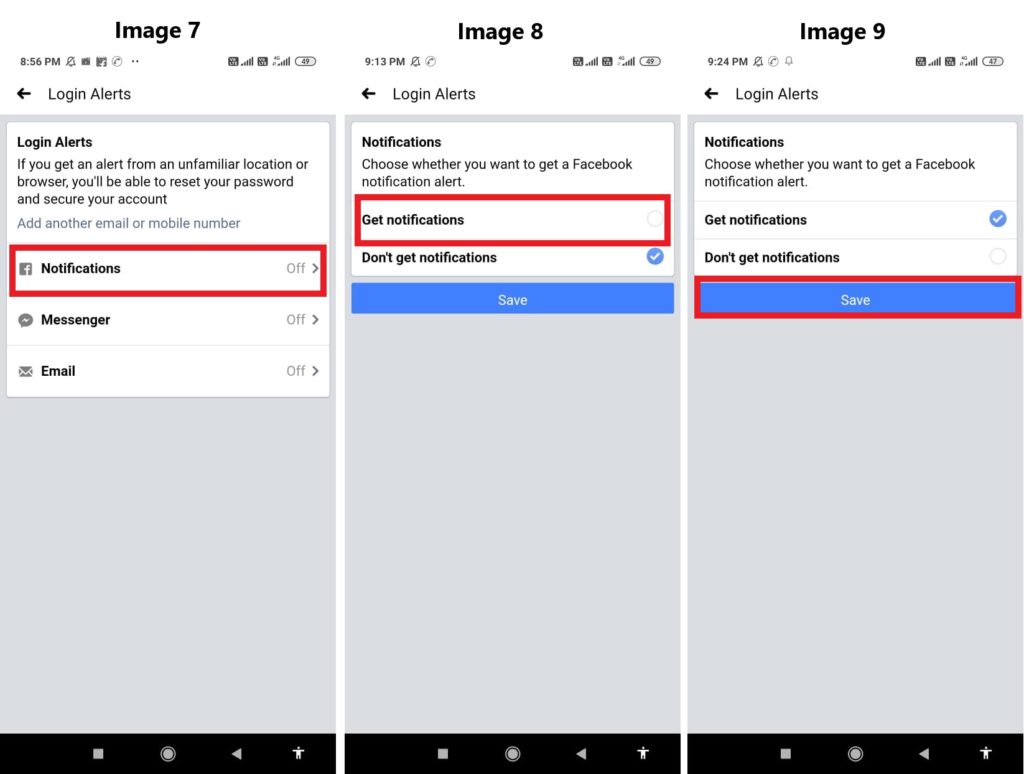
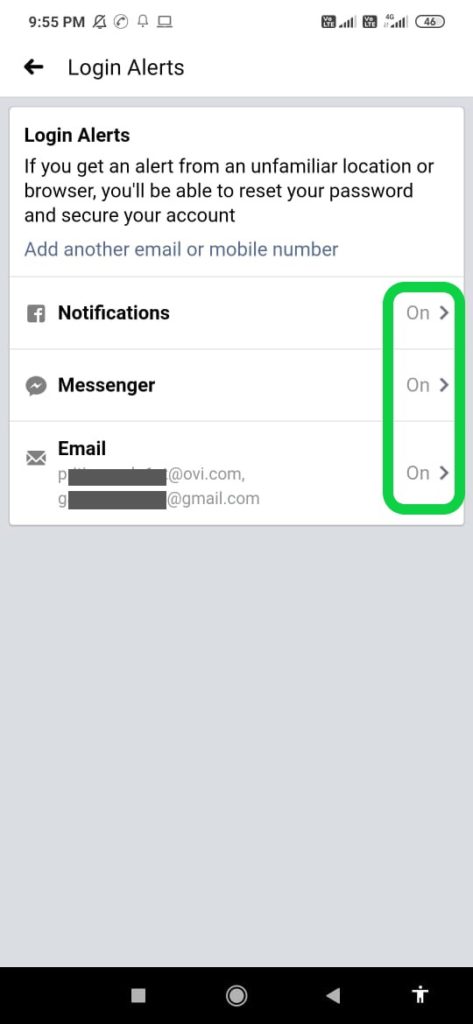
Once you Saved Get notification for all 3 alert. Check to confirm that its showing “ON” in front of all 3 options as its showing in image below.
Note- When you are changing alert On, check and make sure the Phone number and Email Id that are saved on Facebook are active, if not you get option to Add Phone number and Email id, kindly update and then Save Get Notification.
Part 6- How to block and unblock someone on Facebook
Section A- How to Unblock someone on Facebook?
Facebook allows you to block people on Facebook. Once you block them they will not be able to find you on Facebook. You can block people who are in your friend list and also who are on Facebook but not in your Friend list. Like some random person who you don’t know keeps messaging you, sending friend request. Blocking someone on Facebook is very easy. If you don’t know then follow the steps given below.
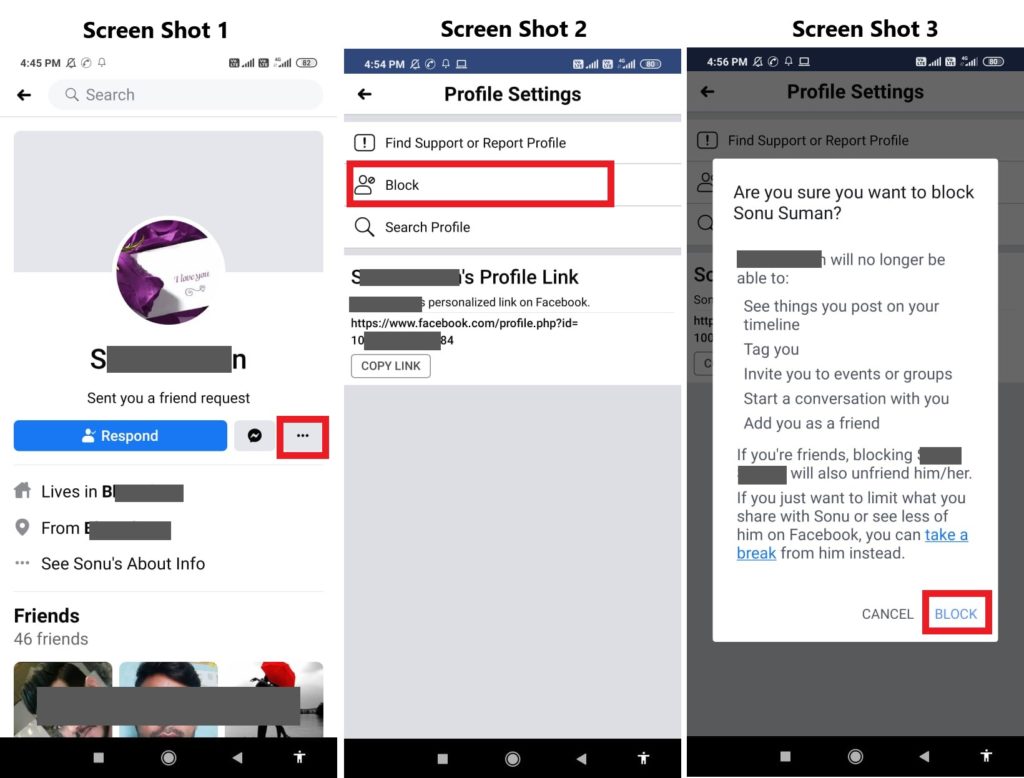
Steps – Open the profile of the person who you want to block and on that person’s profile Page click on 3 dots [See Image 1 Below] it will take you to next page where you can see option “Block” just tap on Block, a pop will appear with a message there again tap on BLOCK to confirm and that person will be blocked.
Section B- How to Unblock someone on Facebook?
Sometimes people get upset and in anger or for some reason, they block someone, later regret blocking their friend and now want to Unblock them. If you don’t know how to unblock blocked people on Facebook, follow the instructions below and unblock them.
Note- All the important areas where you need to tap are highlighted in read box.
Step 1- Log in to your Facebook Account, Click on three small horizontal lines shown on upper Right side of your Facebook App [See Image 1] to go to Settings Page.
Step 2- Scroll and tap on “Settings & Privacy” [See Image 2]a drop menu will open in that select “Settings” [See Image 3].
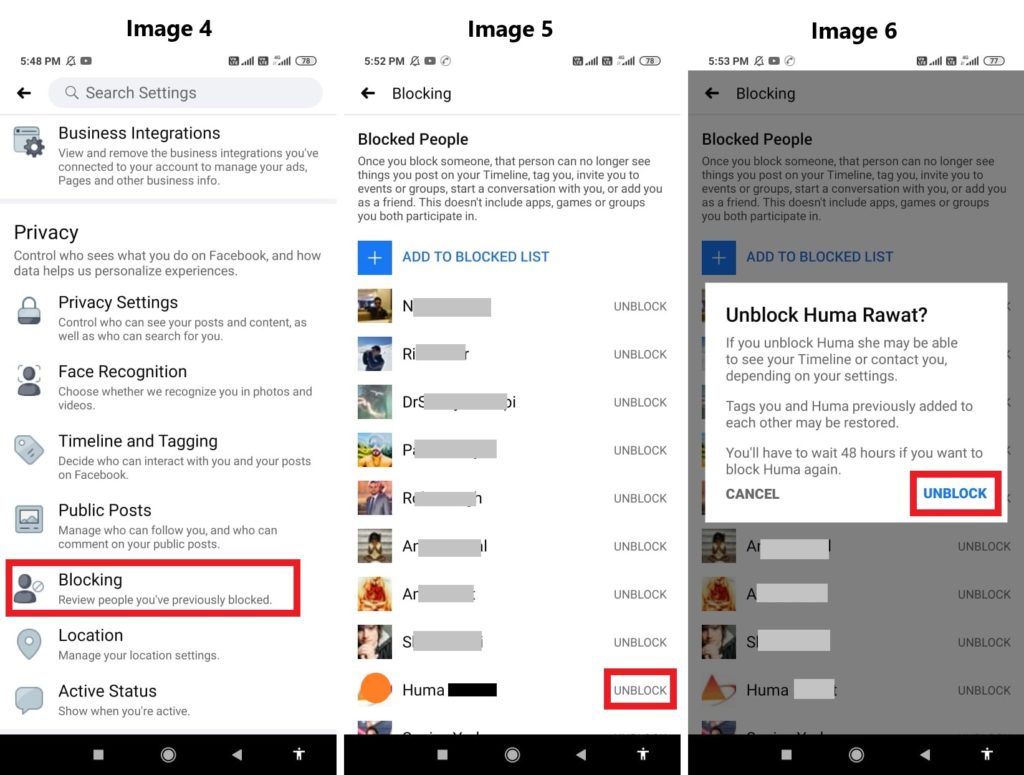
Step 3- On settings page scroll and find “Blocking” tap on it and you can see all people you have blocked on Facebook. To unblock just tap on Unblock tab in front of that person’s name, a pop up will appear there too tap on “UNBLOCK” and that person will be unblocked.
Remember a person you just unblocked cannot be again blocked for 48 hours, if you want to block him/ her again you have to wait for minimum 48 hours.
Part 7- How to Download all Photos and videos you have on Facebook
If you are interested in saving an offline copy of all your Photos and Videos, you can do that at once. Now you don’t have to download one by one all photos or videos if you want them to save offline for other purpose. To know how follow the steps given below.
Note- All the important areas where you need to tap are highlighted in read box.
Step 1- Log in to your Facebook Account, Click on three small horizontal lines shown on upper Right side of your Facebook App [See Image 1] to go to Settings Page.
Step 2- Scroll and tap on “Settings & Privacy” [See Image 2]a drop menu will open in that select “Settings” [See Image 3].
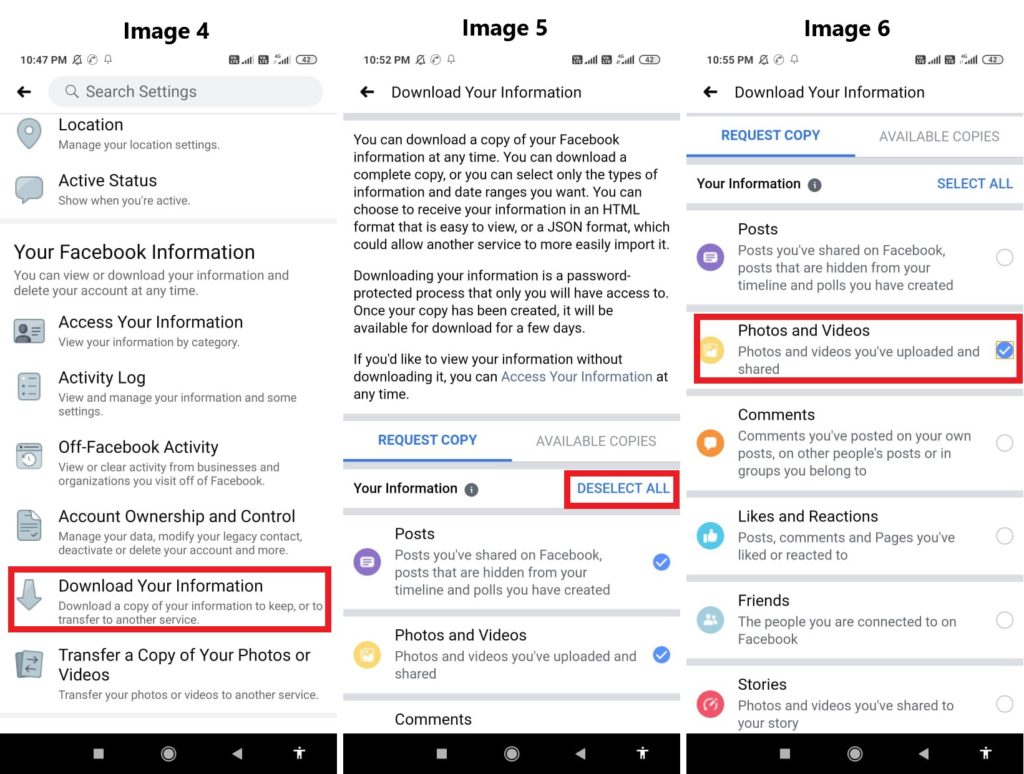
Step 3- On Settings page scroll and find select “Download Your Information” you will find it under “Your Facebook Information” now on next page you can see the data for which you can Request Copy from Facebook. By default all data request are selected [Below see Image 5] first “DESELECT ALL” then just select “Photos and Videos”
Step 4- Then scroll up and reach end of the page there at end you will see option “CREATE FILE” select it and wait. After few minutes when file is available to download you will get a notification on Facebook and you will also receive an email too.
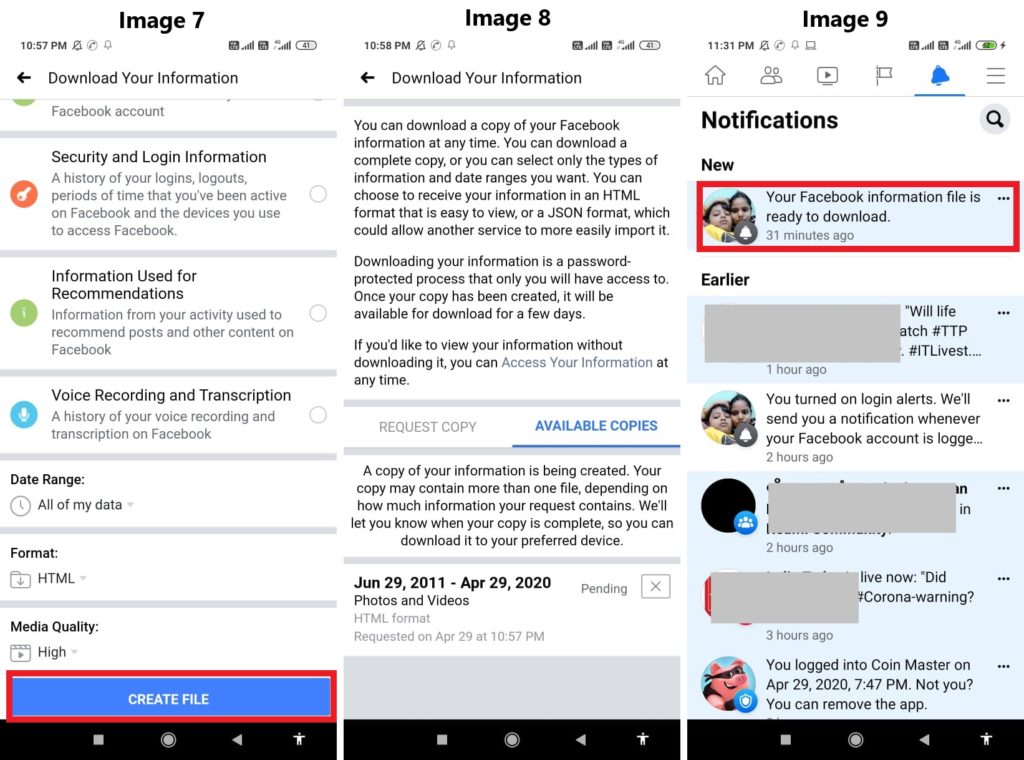
Step 5- Click on the notification you received confirming File is ready to download. It will take you to the “AVAILABLE COPIES” here you can also see the size of the file, now select DOWNLOAD and it will forward you to your phone browser.
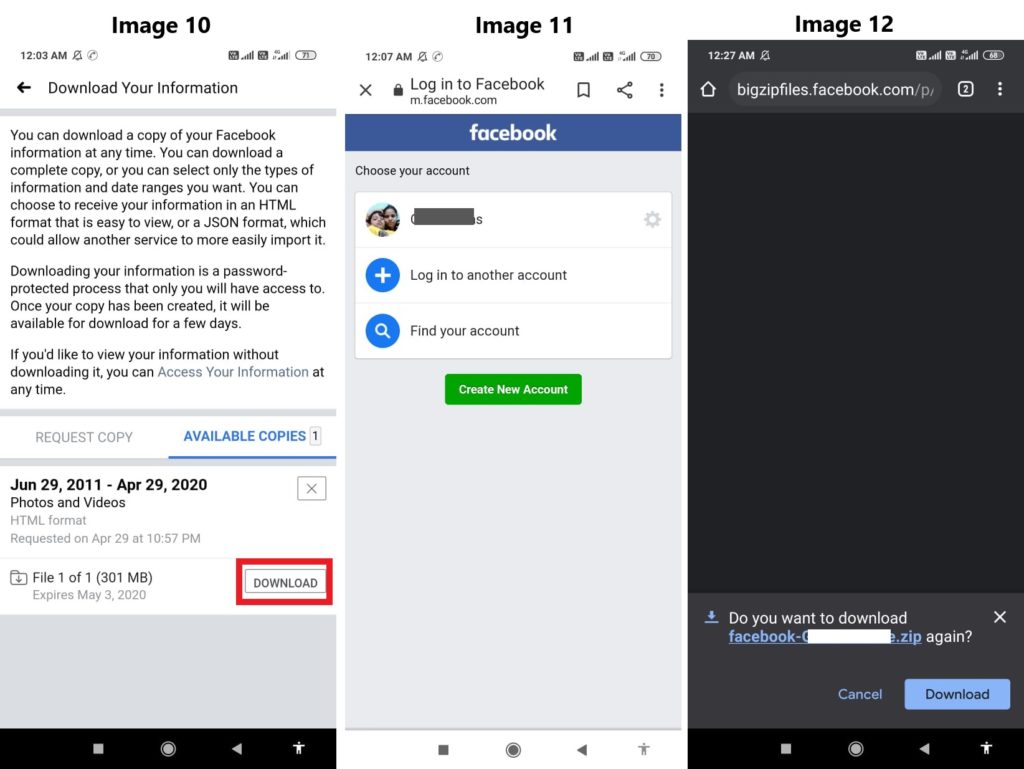
Step 6- On browser it will ask you to login if you have never logged in on the browser. Log in, then it will confirm Facebook Password, once password is confirmed automatically Download option will pop up on your phone screen. Just click on download and all your photos and videos will download. The download will a zip file unzip/ extract and you can see all your Facebook photos and videos.
Note- Its recommended download the file on PC / Laptop if you want to save a offline copy. Download steps are same for PC. You can also click on the link sent in the Email by Facebook to Download Available file.
Follow the same steps to download your Facebook Messenger Conversations as you downloaded Photos and Videos, just deselect all other data and select “Messages” rest steps are same.
Part 8– How to update/ add new email and phone number on Facebook
If you want to add or update new number or email id, on your Facebook account wondering how? Follow the Steps given below.
Note- All the important areas where you need to tap are highlighted in read box.
Step 1- Log in to your Facebook Account, Click on three small horizontal lines shown on upper Right side of your Facebook App [See Image 1] to go to Settings Page.
Step 2- Scroll and tap on “Settings & Privacy” [See Image 2]a drop menu will open in that select “Settings” [See Image 3]
Step 3- On settings page you can see the first option “Personal Information” just select that, on next page you can see your saved phone number and email Address. Tap on on your saved “Phone Number” now on next page select option “Add Phone Number” and the follow on screen instruction and save new Number on Facebook.
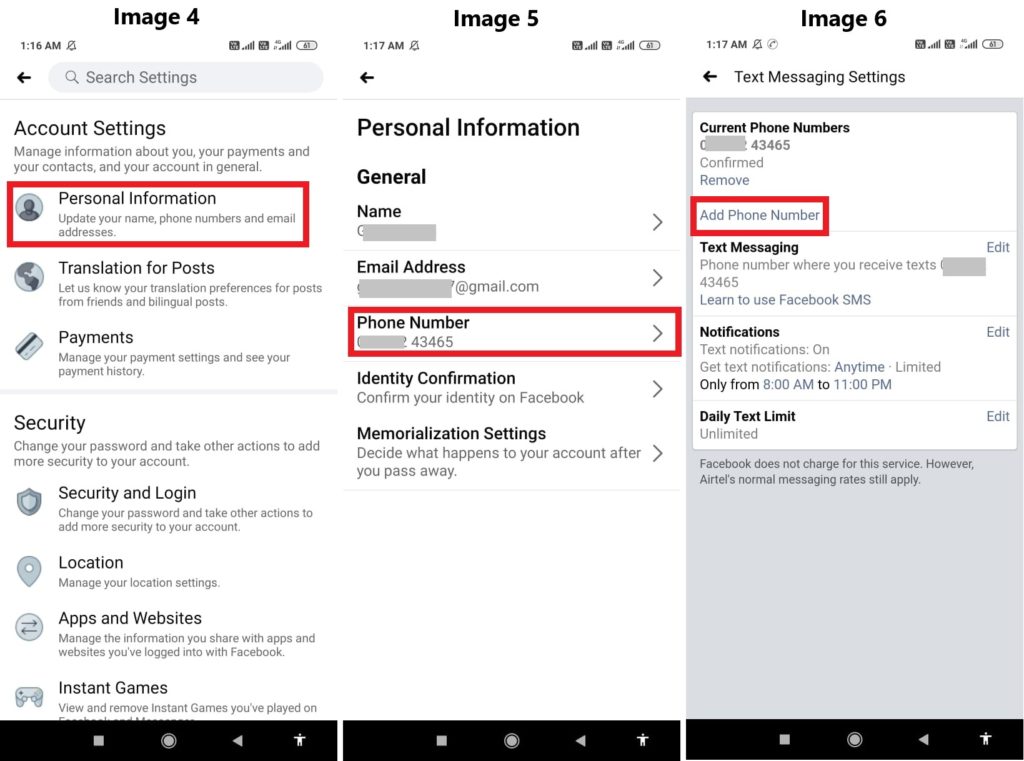
If you want to update new Email address tap on email follow on screen instruction and update new Email address on Facebook.
Part 9– How to recover deleted Facebook Messenger chats deleted by sender
Initially Facebook messenger user were just able to chat over text and send media like photos and videos. But now Facebook messenger has become more popular as it now supports voice calls as well as video calls.
There is no problem with voice and videos calls done via messenger. Lot have changed and new features are added to Facebook messenger among which one feature is ‘Remove For Everyone’.
Well! Now lot of users are now using this feature and now and then one can see ‘Someone removed a message’ on messenger. If seeing the message sent to you was deleted by sender makes you anxious to know what it was? Want to know what was deleted by the sender? Then continue reading and know how to recover deleted messages sent.
Here I will be honest with you, before I wrote this article, I read lots of article wasted at list half day trying the various methods that was given I tried them all none of it worked.
Some said to try ES file Explorer, other said to explore file on PC, one dumb suggested check archive, come on if a user will archive a message that saved already how that’s recovering deleted messages.
One also suggested you can download your information from Facebook and recover the deleted messages. Well tried that too I myself deleted some recent messages and then downloaded My chat history information from Facebook. Guess what? That too did not work.
So, what ever was deleted in Facebook messenger be it by me or the sender it was not recovered by me. Wait there is catch here I said what’s deleted can’t be recovered. But I found a way by which you can make sure if a sender deletes messages in future you can read that.
How is that possible, its very simple there is are Apps by name of “Notisave” you just have to install it and give permission it asks for and allow auto start. The best thing is that these Apps are available on Google’s play store. Below are the links for both Apps.
Note – Both the Apps only saves text messages deleted on Facebook messenger, in situation a photos or videos is sent and deleted by sender it’s not saved by any of the Apps. Moreover the apps are also unreliable as sometimes it works sometime it doesn’t, so use it at your own discretion.
Part 10- How to Recover Deleted Photos and Videos Downloaded from Facebook
It happens many time that you like some post and you download that Photo from Facebook, and save it on your phone. But accidentally, if have deleted that photo or video that you downloaded from Facebook? You can recover it using Android Data Recovery.
Download Android Data Recovery
 |  |
 |  |
With the help of this Android Data Recovery, you can also recover deleted / lost data such as Contacts, Call History, Documents, Photos, Videos and other types of data from your Android smartphone, be it from any brand. You can also use it to extract deleted content from Memory card used in your smartphone.
Wrap Up
So, here now we come to end of this article, in this article I have discussed the important features that all Facebook users should be aware of. we hope we were able to help answer all the queries related to this topic. If you have any other issue related with Facebook please let us know. We will try to help you in the best possible way we can. The best way to reach us is via Facebook so.
Like & follow us on Facebook & Twitter, ask if have any questions you can also click on Contact Us link at end of page and send us your query, we will help in best possible we can, but for quick reply contact us via Facebook.