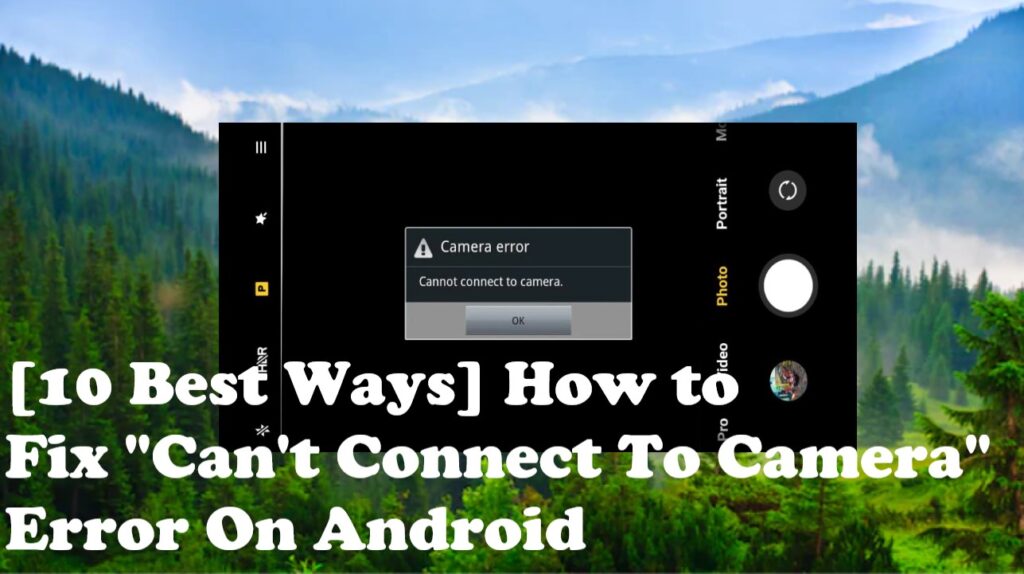
Is your Android Smartphone’s camera showing an error “can’t connect to the camera”? There are several Android phone users who are frustrated with this issue. It’s very frustrating when you want to take photos or make a video and the camera won’t work. When this happens, you can see the error message notification “can’t connect to the camera” on the black screen of your phone.
Can’t connect to the camera!
This can be very frustrating when your Android device starts showing this issue.
The camera malfunction error has become very common and can appear on any Android smartphone or tablet. The brand doesn’t matter, whatever brand’s Android phone you use. You can encounter this issue with cameras on any android phone.
What can be the reason for this camera malfunction? This question might come to mind. Well, normally this error can be a software issue and sometimes a hardware issue. In rare scenarios, it might be both a software and hardware issue.
So, what could users do to fix this error camera that isn’t working on Android? Well-read ahead, we have prepared this comprehensive article, focusing on methods to fix this camera error issue. In this article, we have given several solutions and also covered the reasons that can be the root cause of this camera malfunction error on your Android phone or tablet.
Reasons That Can Cause the Error “Can’t Connect to Camera”
There are multiple reasons that might cause the “can’t connect to the camera” issue on any Android device. Below we have mentioned the most common ones, that can be one of the possible reasons causing this error on your Android device.
1- Software Issue: There can be some corrupt files in your Android phone/tablet that might cause this error in the software. Which can trigger this camera error.
2- Low RAM: Low RAM devices, with multiple Apps running in the background on Android, also can cause this error.
3- Low Internal Storage Space: Your Android phone/Tablet might have low free storage space; it also may trigger to show this camera error.
4- Compatibility Issue: There are lots of third-party camera Apps, which we download to get additional features to capture photos, if those applications are not compatible with your device it also can cause this error to appear.
5- Update related Issue: Sometimes a new update can cause such an issue. Even if you fail to keep your device up to date, your Android phone/tablet can show this error.
6- Hardware issue: If your Android phone is damaged, like you drop your phone screen can be ok but it might be some internal damage that might cause this error in your camera.
7- Permission Granted to Third-Party Apps: In a hurry to use some Apps we give permissions to third-party apps to access the camera. This too can cause this error to appear on your Android phone/tablet.
Now when you know the reasons that might be causing this “can’t connect to camera” issue on your Android phone/tablet. You might be thinking about how to fix it.
“Can’t Connect to Camera” How to Fix this issue on your Android Phone/Tablet?
- Solution 1- Restart Your Android Device
- Solution 2- Force Stop Camera App
- Solution 3- Use Other Camera Apps
- Solution 4- Clear Camera Apps Cache and Data
- Solution 5- Disable Third-Party Apps by Safe Mode
- Solution 6- Clear Android Phone Cache Partition
- Solution 7- Reset Your Android Phone App Preferences
- Solution 8- Clear Framework Cache of Google Services
- Solution 9- Fix the “Can’t Connect to Camera” error using Android Repair
- Solution 10- Factory Reset Your Android Phone
Below the above-mentioned solutions are explained in detail with steps. Regardless of which brand Android device, you have the solutions discussed here that are applicable to all Android devices. On a few Android devices, the steps might be different due to their UI. So, check out the solutions and fix the “Can’t Connect to Camera” issue on your Android Phone/Tablet.
Solution 1- Restart Your Android Device
Soft reset your device by just restarting your Android Phone/Tablet. Most of the Android phone errors and minor issues are fixed by a soft reset that is done when you restart your Android device. Just switch off your Android device and restart it after 3 – 5 minutes.
After you restart your device check your camera if still, it showing the same error restart it again. Try it 2 – 3 times if still showing the “Can’t Connect to Camera” error then only move ahead to the next solution.
Solution 2- Force Stop Camera App
You can Force stop your Android Phone’s Camera and fix “Can’t Connect to Camera” for some users this fixed this issue. To do so follow the steps given:
Step 1- Open the phone’s Settings.
Step 2- Scroll and find Apps, tap and open them.
Step 3- On the next page tap and open ‘Manage apps’.
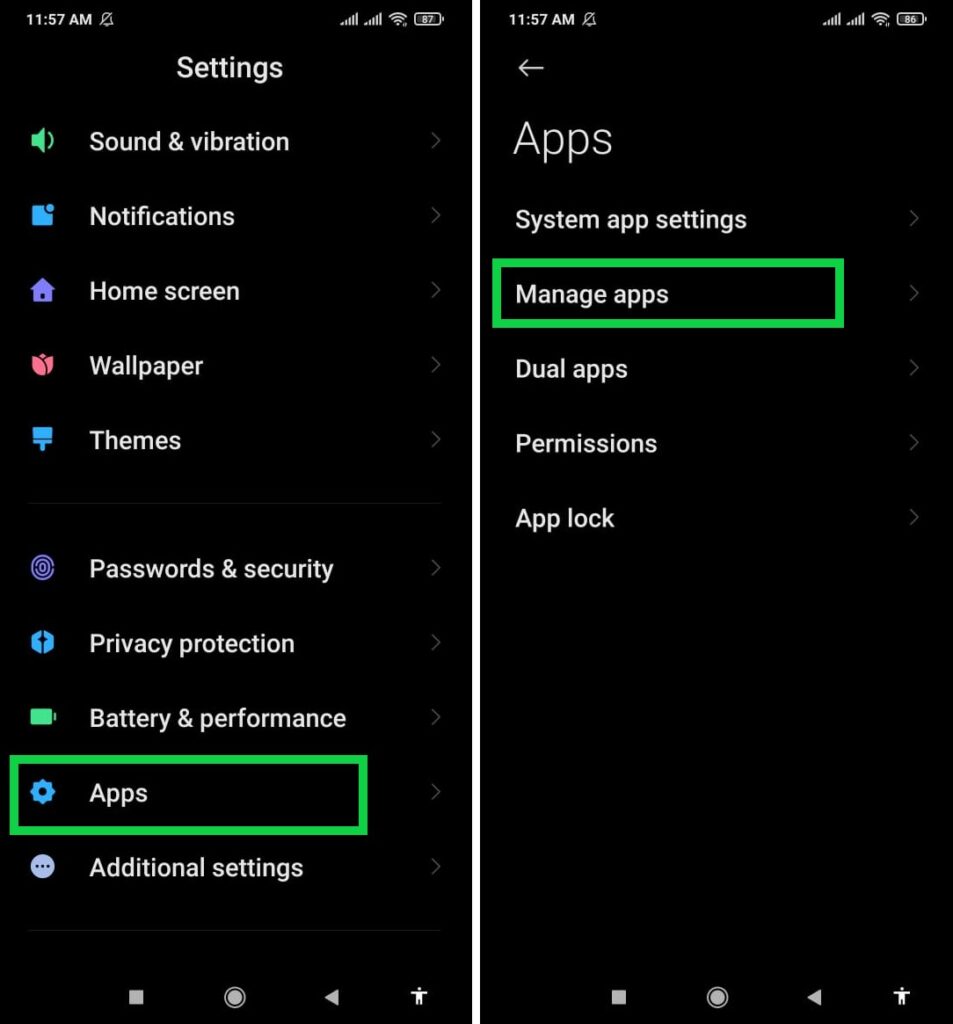
Step 4- Tap and select Camera App and open it tap on Force stop.
Now go back to the camera and open and check if the error is fixed, if it is you will be able to capture photos.
Solution 3- Use Other Camera Apps
Sometimes it’s possible the default Camera App might have some issue, due to which it not responding and not working. To find out if it’s just the default camera App issue try third-party camera Apps.
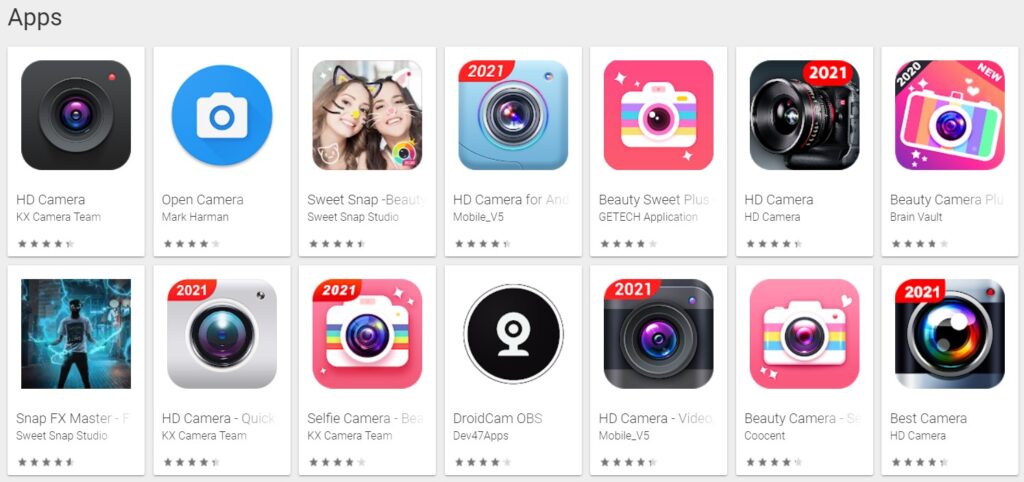
Go to the Play Store and search Camera Apps, you will see there are many camera apps that download and install. Open the camera using this third-party App and take photos if it works then the issue is in the default camera App. Now to fix this issue try the next solution.
Solution 4- Clear Camera Apps Cache and Data
Clearing Camera’s Apps Cache and Data can fix this “Can’t Connect to Camera” error. To delete Camera App data and cache follow the steps given below:
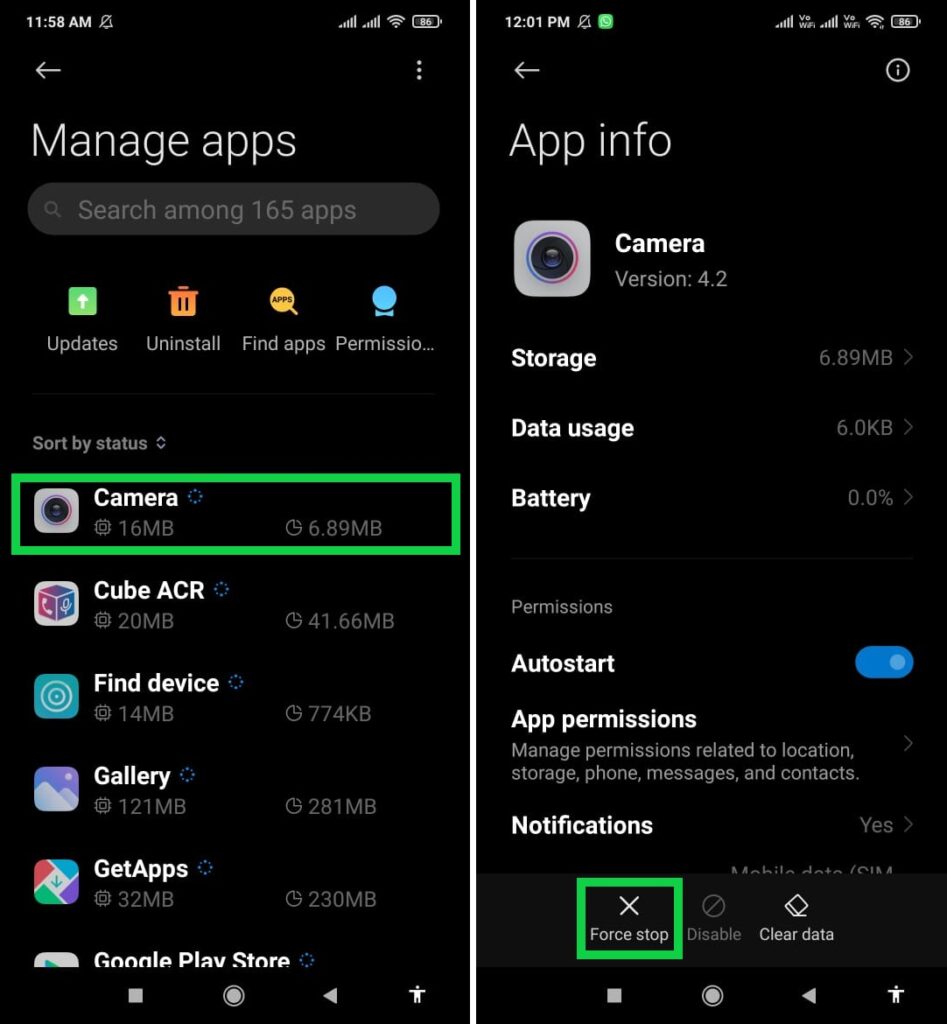
Step 1- Open the phone’s Settings.
Step 2- Scroll and find Apps, tap and open them.
Step 3- On the next page tap and open ‘Manage apps’.
Step 4- Tap and select Camera App and open it and select ‘Storage’.
![]()
Step 5- Here is clear Data and Cache
After you have cleared the data and cache, open your camera and check if the “Can’t Connect to Camera” error is fixed or not. This should fix the issue but yet if the issue persists try the next solution.
Solution 5- Disable Third-Party Apps by Safe Mode
On Android devices, there is a feature called “Safe Mode”. When you restart your Android device in safe mode it allows only essential apps and features. All third-party Apps get disabled in this mode. To restart the phone in safe mode, follow the steps below:
Press and hold the power switch of your phone and wait till you see the Power off option.
Touch and hold the Power off, till you get a pop-up message on the screen showing Reboot to Safe Mode. Press OK and your phone will restart in Safe Mode.
You can Boot your Android phone in Safe mode in two ways, first when your phone is ON and second when your phone is switched OFF.
When the phone is ON how to Boot your phone to Safe Mode:
Press the power button and hold. When power off options appears on the screen, press and hold it for a few seconds.

Then pop up to boot the phone in Safe Mode will appear. Press OK and your phone will boot to Safe Mode.

When the phone is switched off, how to boot the phone to Safe Mode:
Some device UI are different and the above-mentioned option (to boot Safe mode while the phone is on) might not be available. Here you have to switch your phone off and then you can boot your phone to safe mode. Follow the instruction below.
Press your phone’s power button and hold till the Android bot animation appears. Then when the Android bot appears press the Volume down button and hold till the Android bot disappears and then the phone should restart in Safe Mode.
To exit from Safe Mode to regular mode just Restart your phone.
Now when your Android phone/tablet is in safe mode, open your camera and check if it’s working. If the camera is working take a photo and close and again reopen and see if now camera is working normally. If now your camera is functioning it means some third-party App is causing this error. Restart your device again to go back to normal mode and find the Apps and uninstall them, this should fix the error “Can’t Connect to Camera”.
Solution 6- Clear Android Phone Cache Partition
If your phone camera is not working and showing an error after you updated the camera App. This could be the update that caused the error, so to fix this wipe the cache partition and this could fix the camera error in your Android device.
To wipe the cache partition on your Android phone, follow the steps shown below:
Switch off your phone
Step 1- To go to Recovery Mode on Samsung Galaxy Phones press the “Volume Up” and “Bixby” buttons together. On other Android phones that don’t have a Bixby button. When the phone is switched off, press the Power switch and Volume Up button both at once and hold till recovery mode options appear on your phone’s screen on some android devices it may show Boot mode tap on it, and go to recovery mode.
Step 2- Press the “Power button” altogether until the phone vibrates.

When you see the device logo on the screen you can release all the buttons, then wait for a few seconds for the Recovery screen to appear. The screen will as shown in the image below.
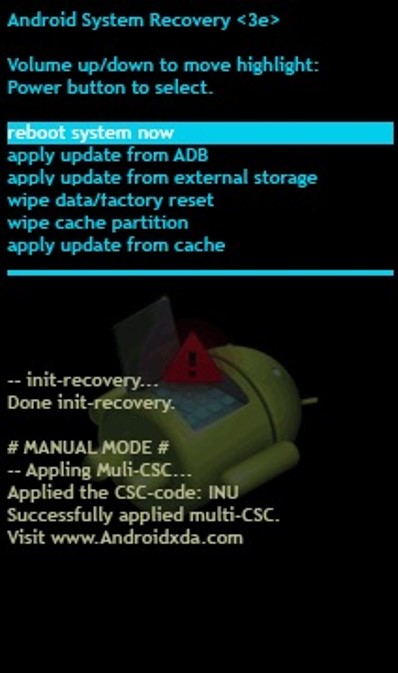
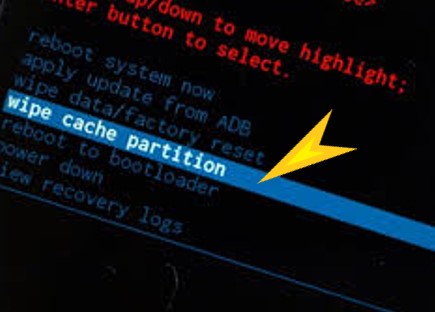
Step 3- From available options on-screen select “wipe cache partition” use volume buttons to navigate and press the power button to wipe the cache partition when it’s done, reboot your Android Phone.
This is a safe way to fix the “Can’t Connect to Camera” error on Android Phones it does not delete any data on your phone. It just deletes/cleans temp files and unnecessary data.
The recovery mode will show options on your phone’s screen, use the volume button and choose the option wipe cache partition and press the power switch to select it and wait. Your phone now will restart after clearing the cache partition. After you have done this open your phone’s camera and check if the error “Can’t Connect to Camera” is fixed or not.
Solution 7- Reset Your Android Phone App Preferences
A simple App Preferences reset sometimes too can fix the camera not responding issue.
To do so follow the steps shown below:
Step 1- Open the phone’s Settings.
Step 2- Go to Apps or Apps Manager and open it.
Step 3- On the next page tap on the 3-dot menu in the upper left corner of your phone.
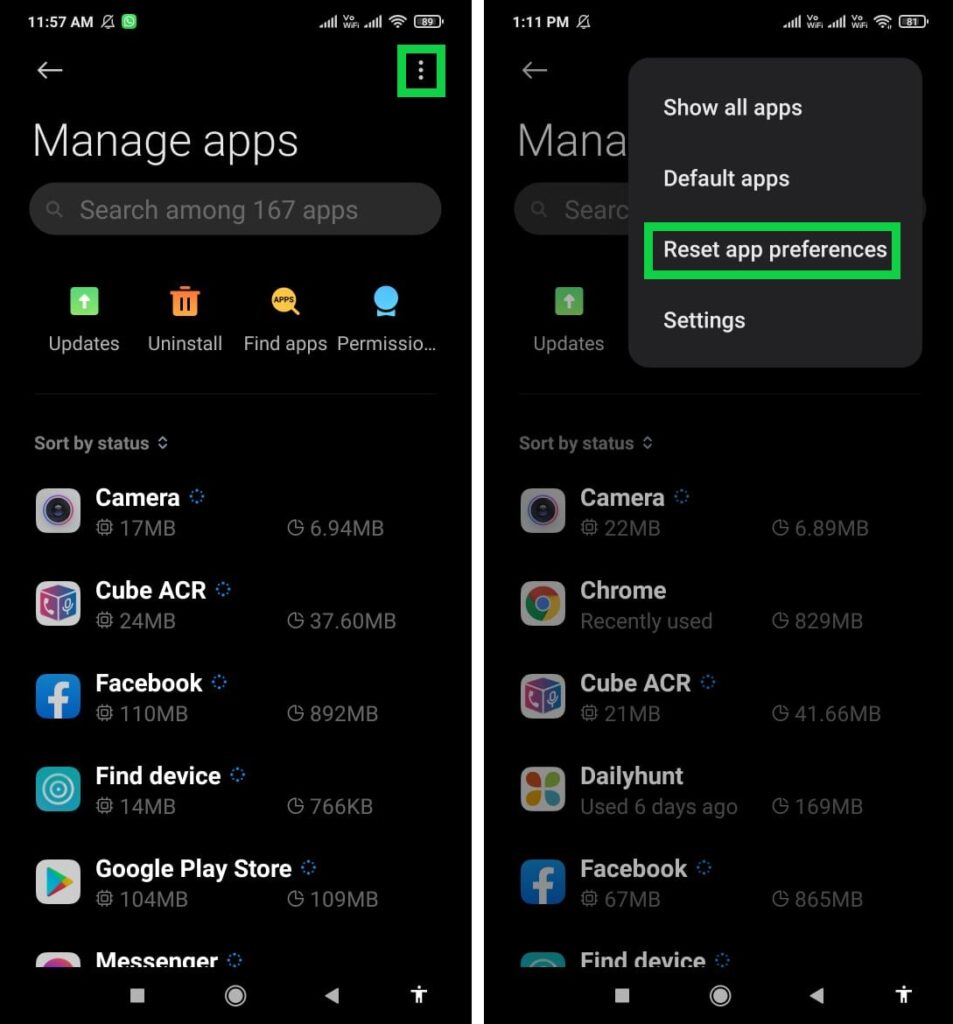
Step 4- when you tap to open the 3-dot menu you tap and select Reset app preferences.
Now just restart your Android device and check it should fix your camera’s issue.
Solution 8- Clear Cache of Google Framework Services
This Google Framework Services keeps all apps data in sync and make sure all apps are working properly. So, if you are using a Google camera and facing such “Can’t Connect to Camera”. error it can be fixed by clearing Google Framework Service’s cache.
To clear the Google Services Framework cache follow the steps given below:
Step 1- Open the phone’s Settings.
Step 2- Scroll and find Apps, tap open it and select all.
Step 3- Scroll and find Google Services Framework > Storage > Clear Cache
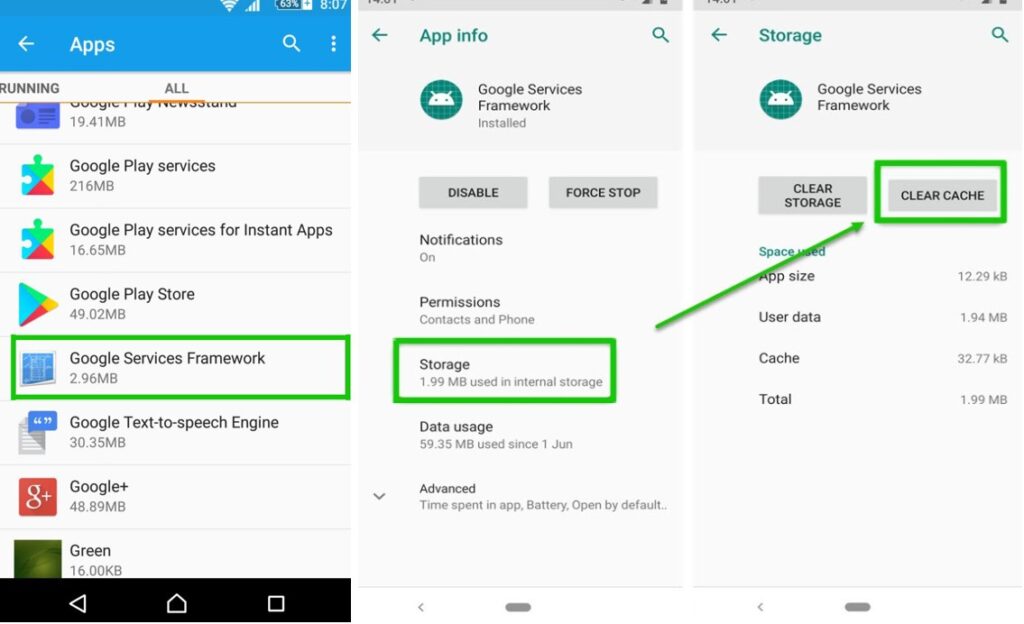
Note- In some devices this Google Services Framework could not be seen, as it has its own UI framework for example in Xiaomi device you will see Xiaomi service framework instead of Google Services Framework.
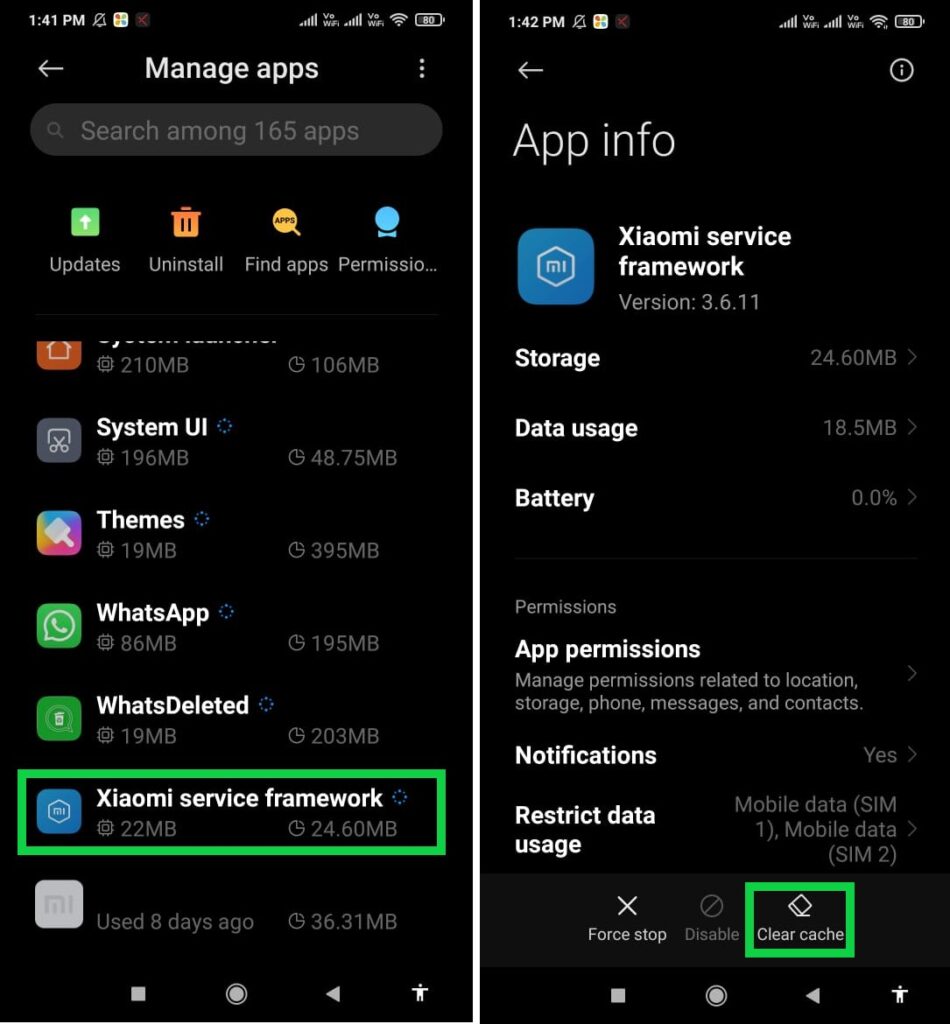
Finally, restart your device and this should do the fix.
Solution 9- Fix the “Can’t Connect to Camera” error using Android Repair
Apart from all the solutions given above, there is an alternate method to fix your Android phone issues that using software Android repair. This software is software that can be installed on your Windows computer.
Using this App, you can fix “Can’t Connect to Camera” in quickly in a few minutes. This is a tool that is compatible with mostly Samsung’s Android Phones/Tablets. Along with the camera error, this tool can also fix several other Android phone issues like App crashing, slow phone, unresponsive screen, and much more. This Android repair will fix many such issues in your Android phone in just one click.
Download Or Buy Now Android Repair
 |  |
Solution 10- Factory Reset Your Android Phone
After you have tried all the methods discussed above, yet if the issue “Can’t Connect to Camera” persists. The last resource that is left is to factory reset your Android Phone/Tablet. There are two methods to Factory Reset Android devices. The first method is when the phone is ON off and the second is when the phone is Switched Off.
Important note: Before you perform a factory reset backup your data from your Android Phone/Tablet to your PC, because a factory reset will wipe all the data from your Android Phone/Tablet.
Read More: How to backup your data from Samsung Galaxy Smartphones
After you backup, all your data from your Android Phone/Tablet, follow the steps given below and perform a factory reset.
Method 1
Step 1. Go to your Phone Menu >Settings > Backup & reset. Once you click on Backup & reset a new page will appear where you can see the option ‘Factory data reset’

Step 2. Press the ‘Factory data reset’ tab
Step 4: If everything is done right you will see an Android bot on the screen, wait and your device will reset in a few minutes.
Method 2
Switch off your Android Phone/Tablet.
Step 1- To go to Recovery Mode on Samsung’s Android Phones press the “Volume Up” and “Bixby” buttons together.
Step 2- Press the “Power button” altogether until the phone vibrates.
Note: On other Android phones that don’t have the Bixby button. When the phone is switched off, press the Power switch and Volume Up button both at once and hold till recovery mode options appear on your phone’s screen on some android devices it may show Boot mode tap on it, and go to recovery mode.
When you see the device logo on the screen you can release all the buttons, then wait for a few seconds for the Recovery screen to appear. The screen will as shown in the image below.

Step 3- Use the volume key to navigate go to “Wipe data/factory reset” then use the “Power button” to select. After you press the power button you will see a screen as shown below with option “Yes” and “No”.

Step 4- Use the volume key to navigate and select “Yes” then press the “Power button” to Factory Reset. Wait for the time the device resets.

Step 5- After the Reset is done, select “Reboot” to complete the reset process.
This shall fix the “Can’t Connect to Camera” issue. Now you can restore your backup data from the backup you created and your Android Phone/Tablet is ready to be used.
Wrap Up
In this post, we have provided solutions to help you fix the camera error “Can’t Connect to Camera”. Along with the solution, we have also provided a tool an Android Repair tool that will fix most of the Android phone errors and issues from your Android Device.