Learn How To Backup & Restore Important Data On Your Samsung Galaxy A50s/ A50. Backup Samsung Galaxy A50s/ A50 Data To Samsung Cloud/ Google AC Or PC.
Overview: Do you want to reset your Samsung Galaxy A50s/ A50, worried about valuable data. Want to backup data on your Samsung Galaxy A50s/ A50 just to take preventive measures to protect your precious data from being deleted or lost. Looking for solution how to backup Samsung Galaxy A50s/ A50? Then your search ends here.
In this post you can find simple and easy ways to backup Samsung Galaxy A50s/ A50 data to Samsung Cloud/ Google account and computer and restore them back. So, to know how to, go through the post and choose what backup and restore method suits you best.
- Method 1: How To Backup Samsung Galaxy A50s/ A50 To Samsung Cloud.
- Method 2: How To Backup Samsung Galaxy A50s/ A50 To Google Account.
- Method 3: How To Backup Samsung Galaxy A50s/ A50 To Computer.
- Bonus Tip: How to Recover Deleted Data From Samsung Galaxy A50s/ A50 When Have No Backup.
Easily backup Samsung Galaxy A50s/ A50 data to computer
Backup data like Images, Videos, Apps, Audio, Call Logs, Documents, Text, Whats App Messages and more. Can restore back backup data from computer to any Samsung Phone too.
No network connection required, 100% safe and secure as only you have access to your data and easy to use, backs up GBs of data in just few clicks, they say job done within 5 minutes.
Download Now Free Trial Version of Samsung Data Backup And Restore
 |  |
Why To Backup Samsung Galaxy A50s/ A50 Data?
Data backup is extremely important if you don’t want to lose it at any cost. Backup data is not only needed if you lost your device or your device is stolen. Data backup is also required if you are about to perform factory reset, permanently rooting your phone, moving data from one device to another.
There can also be lots of other reasons which could lead to data loss. So, if your data on Samsung Galaxy A50s/ A50 is valuable to you and want to keep it secure from ever getting lost keep backups.
Read the post and see what backup method suits you best and use it.
Method 1: How To Backup Samsung Galaxy A50s/ A50 To Samsung Cloud.
Like Google, Samsung also provides its users free cloud storage up to 15 GB to its users, you can also get more storage but then you have to pay for that extra storage, you can use Samsung Cloud service to back up all data on Samsung Galaxy A50s/ A50.
You can back up data such as Gallery (Photos & Videos), Calendar, Contacts, Call History, Messages, Apps, Settings, Documents, Music, Recordings etc.
Part 1- How to backup data to Samsung Cloud.
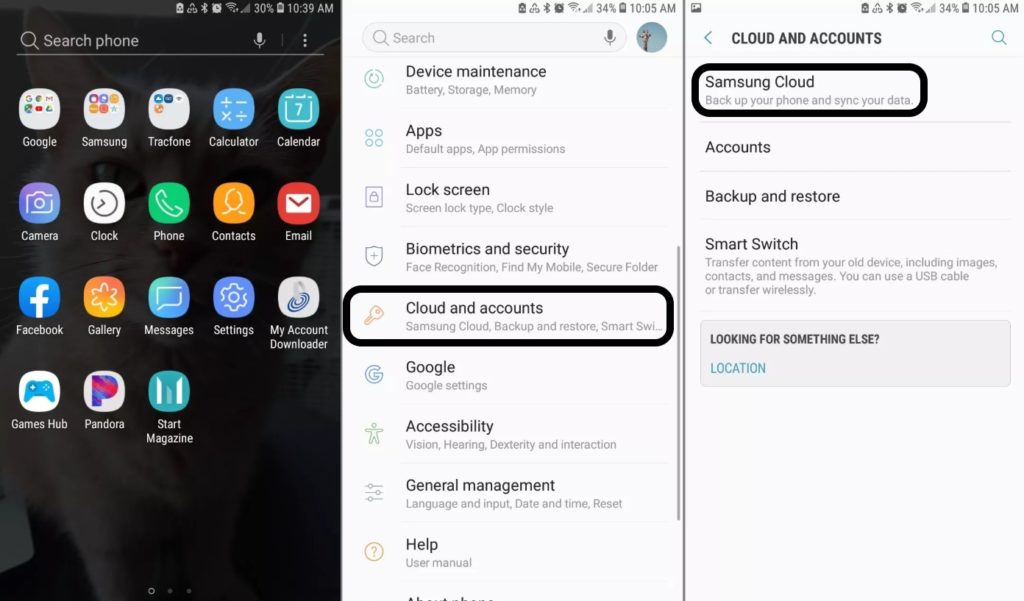
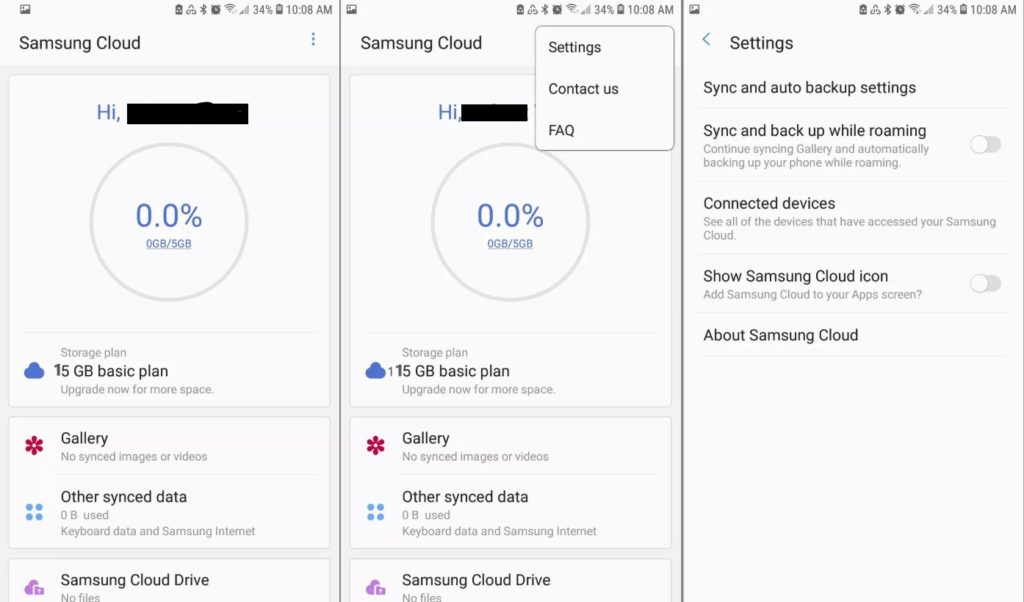
Step 1- Go to Samsung Galaxy A50s/ A50 Settings > Clouds and accounts > Samsung Cloud. If you are opening clod for first time you will be prompted to Sign in or Sign Up for new account. So, sign up and create a new account.
Step 2- Once you signed in, on Samsung cloud screen click on the three dots in the top right corner of the screen. Select settings when the menu appears, then tap on ‘Sync and auto backup settings’
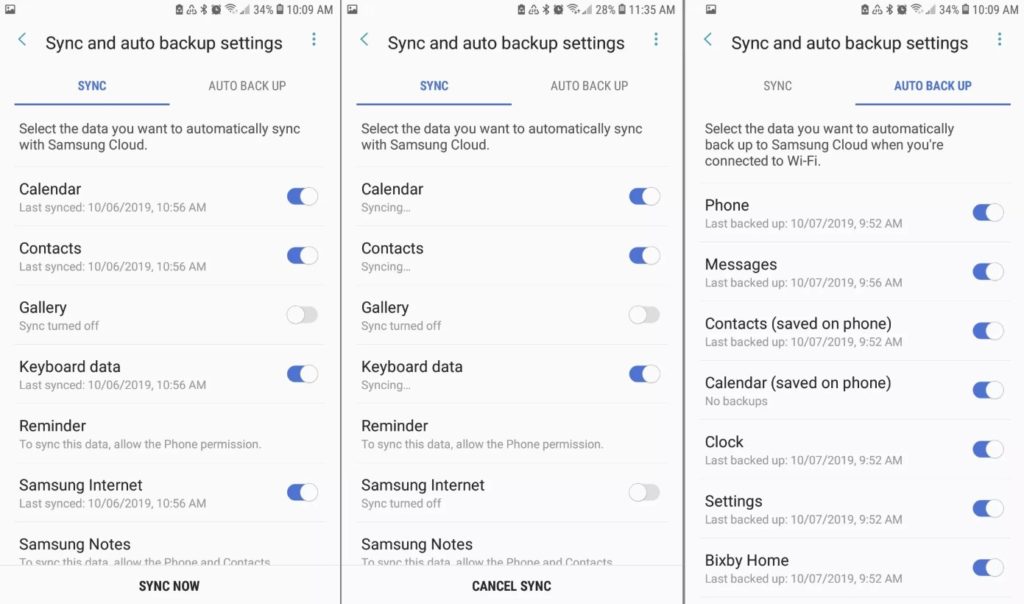
Step 3- Go to sync tab select the type of data to back up and to manual backup tap on ‘Sync Now’. To stay in sync for auto backup tap on ‘AUTO BACKUP’ then go to the type of data you wish to backup and turn the switch on in front of it.
Also Learn- Best Solutions To Recover Deleted Data From Samsung Galaxy A50/ A50s
Part 2- How to restore backed up data from Samsung Cloud.
When you need to restore the backed-up data, simply go to Settings > Clouds and accounts > Samsung Cloud then scroll down and just tap on ‘Restore’.
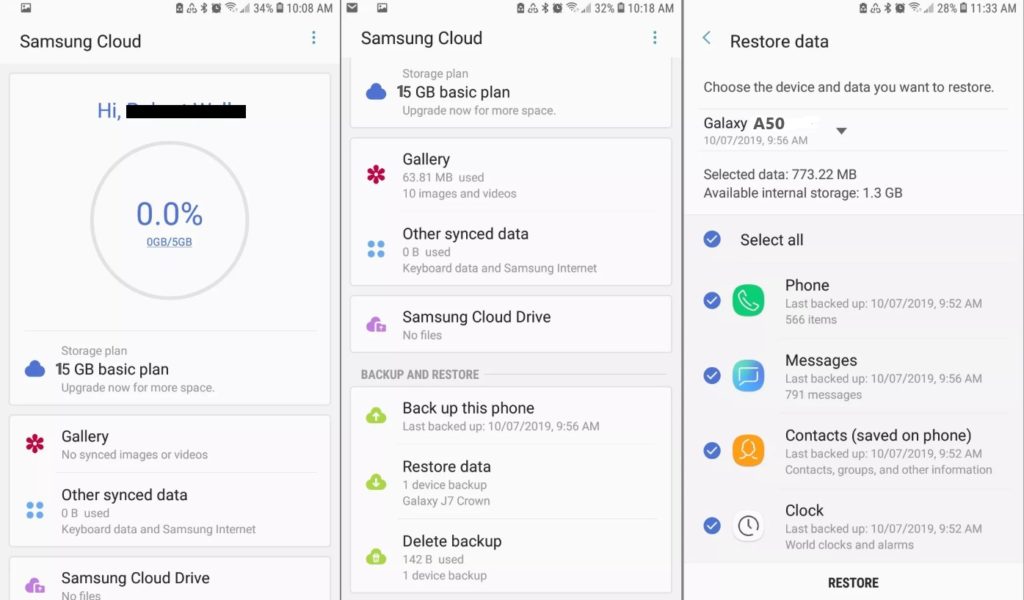
If you don’t want all the backup data to restore, you can also select what type of data you want to restore just select and deselect and restore.
Note: To Back up Data to Samsung Cloud active network connection is needed, you can use your carrier data or wi-fi as per your convenience.
Like Google account you can also view and manage Samsung Cloud data anywhere anytime. You just have to log in to you Samsung account, and you can view and also manage it from other Samsung devices too. On PC you just have to go to http://support.samsungcloud.com and log in to your Samsung account.
Also Read- How To Recover WhatsApp Messages/Photos And Videos Deleted By Sender
Method 2: How To Backup Samsung Galaxy A50s/ A50 To Google Account.
Part 1. Use Google Account to Back up and Restore Apps and Apps data.
Part 2. Use Google Account to Back up and Restore Files Using Google Cloud ‘Drive’
Part 3. Use Google account To Back up Media ‘Photos and Videos’ Using Google App “Photos”
Part 1. Use Google Account to Back up and Restore Apps and Apps data.
This is free account given by Google to its all Android Phone users, which gives you free space up to 15 GB. When you back up your Samsung Galaxy A50s/ A50 to Google accounts you can back up Bookmarks, Data, Wi-Fi Password, Settings, Contacts etc.
Step 1. Got Apps > Settings > Cloud and accounts > Backup and reset. Now turn ‘On’ Back up my data.
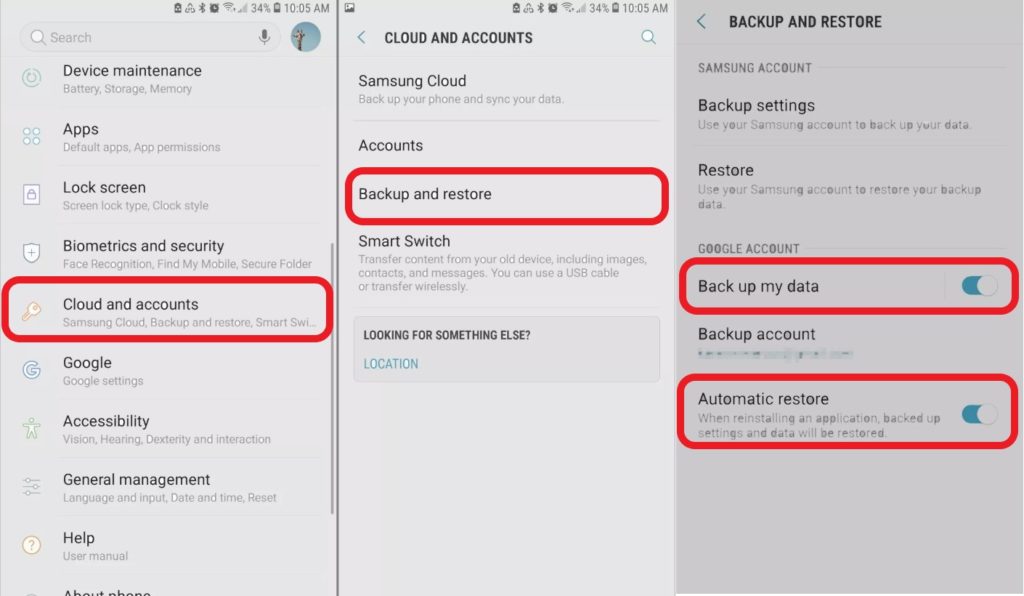
Step 2. Click on Backup account and choose the Google account, if you are logged in to multiple account choose the account you want to use for backup and complete backup set up.
Step 3. Now Backup is active, your Apps and apps settings are all backed up. To keep backup in sync you will need active network connection. Keep automatic restore ‘ON’ so that it automatically restore when reinstalling an App.
To Restore Samsung Galaxy A50/ A50s from Backup, Follow The Steps Given Below:
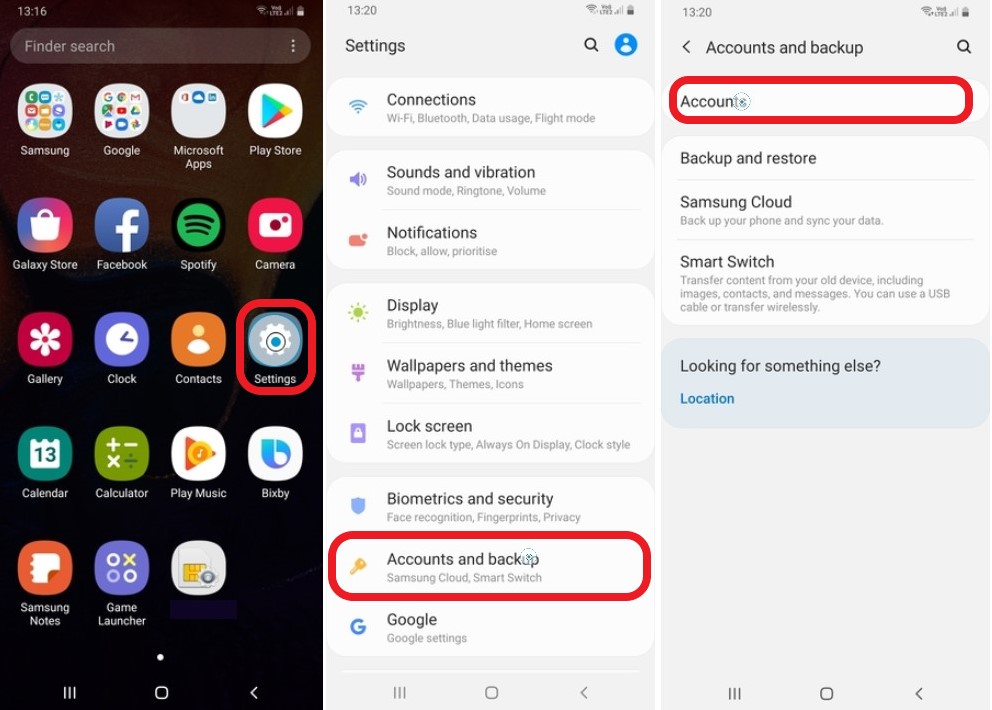
Open menu and go to Settings > Accounts and backup > Accounts
After you click accounts on next screen you can see your Gmail id, the Google account which you used to back up select it, and next screen tap on ‘Sync account’, on next screen click on three dots on top right corner of your screen and open menu.
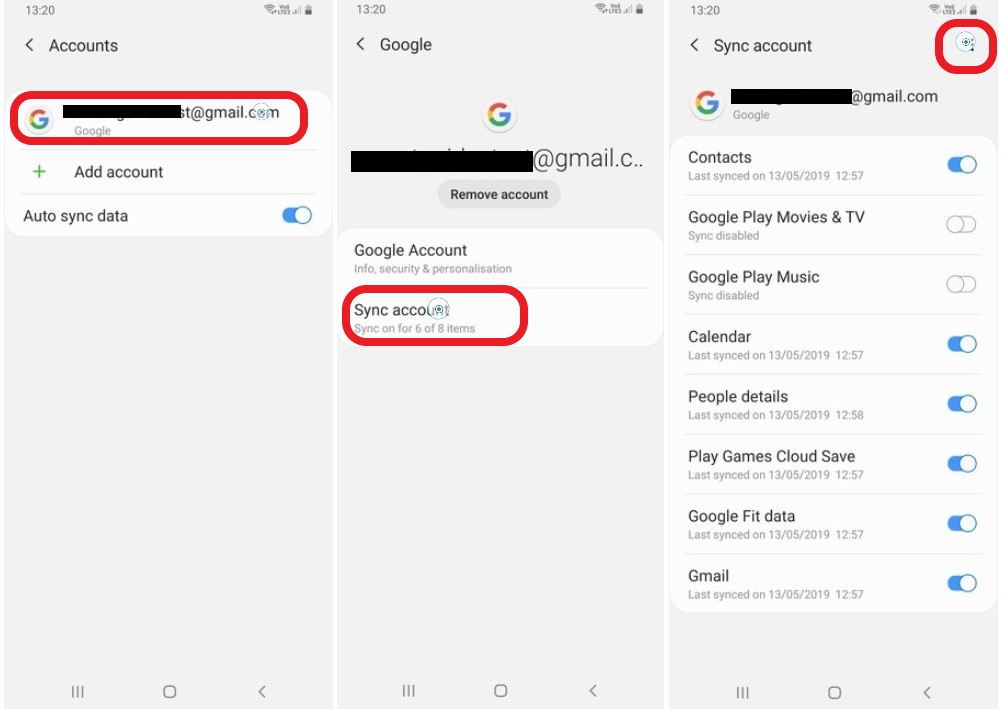
You can now see ‘Sync Now’ tab just tap on it and all your backed up data will sync and restore. Refer the image below.
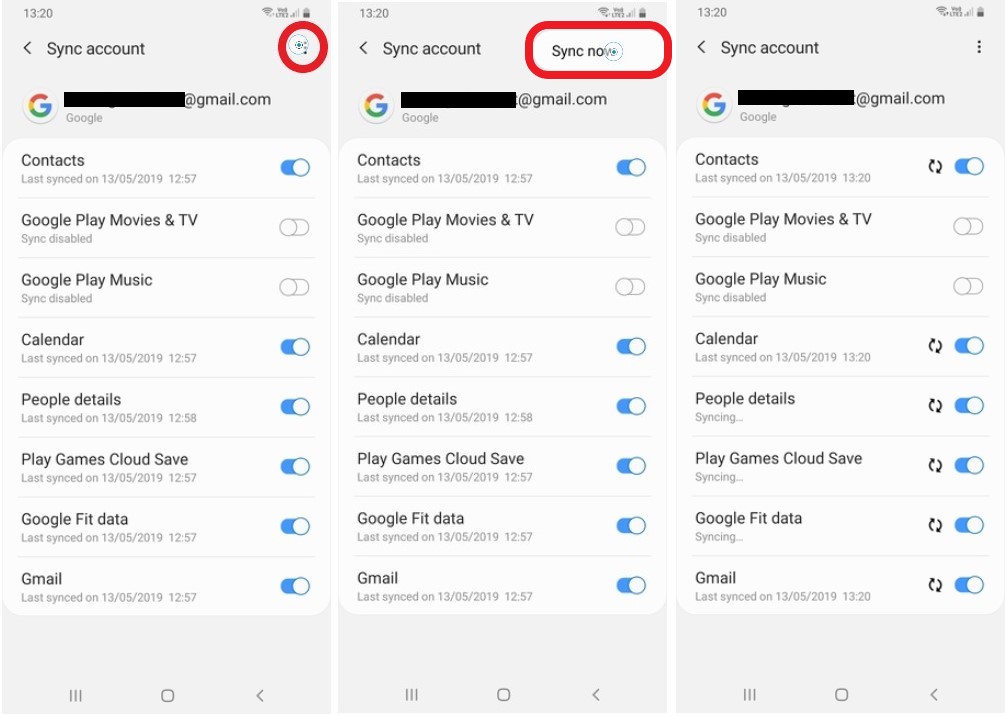
Your Samsung Galaxy A50s/ A50 will be restored to the latest backup.
Also Read- How To Transfer Data From Old Phone To New Samsung Galaxy A51/ A71
Part 2. Use Google Account to Back up and Restore Files Using Google Cloud ‘Drive’
Alternatively, you can also use same Google account and use Google Drive Google’s cloud service, Google Drive one of the most common and popular cloud storage service available for free up to 15 GB, to every Android user, it allows user to backup data on phone to its servers for free.
It is available on every Android device through which you can back your Android phone data and access your files from anywhere. Here you will discover simple step by step complete tutorials How to back up your Samsung Galaxy A50s/ A50 files to Google drive online remote server.
Backup Samsung Galaxy A50s/ A50 to Google Drive

Step 1: Go to Menu and open Google Drive App on your Samsung Galaxy A50s/ A50 check you are signed in if not sigh in using your Google account.
Step 2: Now go back to Menu and go to Settings> Privacy.
Step 3: Scroll find option “Backup my settings” and “Automatic Restore” check both option on and make sure the same Google account is visible through which you signed in Google Drive.
Step 4: Now go back to Settings scroll go to Account & sync and sync your Samsung Galaxy A50s/ A50 with your Google account. To begin press OK
Step 5: Now press “BACK UP NOW” to complete the back up.
Steps To Restore Files On Samsung Galaxy A50s/ A50 From Google Drive Backup
- Open Google Drive app on your Phone.
- Now select and hold the file you want to restore.
- Click option download to restore.
Alternatively, you can download the Samsung Galaxy A50s/ A50 phone’s back up files from Google Drive on your computer too, the steps are as follows:
- Open browser on your Computer & go to https://drive.google.com
- Sign in with the same Gmail id that you used to backup your Samsung Galaxy Note 9 files to Google drive.
- Once you signed in, you can preview all the uploaded files.
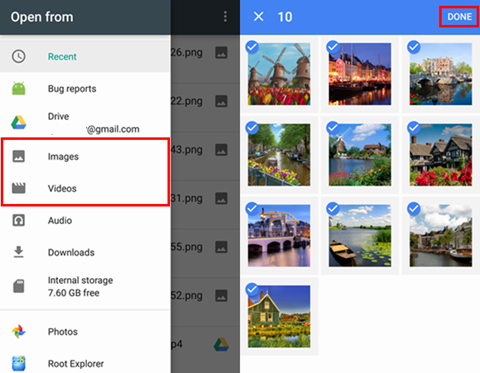
- Now select the file and download it. To download multiple files, press ‘SHIFT’ or ‘CONTROL’ to select other files.
- Once you have selected files right click and click on download.
You May Like To Read: How To Recover Deleted/Lost Data From Samsung Galaxy S10 plus/ S10e/ S10.
Part 3. Use Google account To Back up Media ‘Photos and Videos’ Using “Google Photos”
Now as per new update ‘Google Photos’ App is no longer in sync with Google ‘Drive’. So, to Back up your ‘Photos and Videos’ use Google Photos separately.
Step 1. Log in to ‘Google Photos’ using Google account on your Samsung Galaxy A50s/ A50.
Step 2. Touch on the three horizontal small lines on top left side and go to settings.
Step 3. On next screen touch on ‘Backup & Sync’ and turn it ‘On’ if it’s not ‘On’

You are all done now all you ‘Photos and Videos’ from Camera will be Backed up to ‘Photos’, you can access all the backed up ‘Photos and Videos’ anytime anywhere on any device just have to log in to the google account.

If you want others folders photos and videos on your Samsung Galaxy A50s/ A50 also to be backed up to Photos, go to Photos’s Settings > Backup & sync > Back up device folders.

Here you can see all the folders that can be backed up choose the ones you want to sync with photos, just toggle the switch on in front of the folders. All marked on folders will be back up to photos.
Also Read- How To Recover Deleted Data From Samsung Galaxy Tab S6/ Tab S5e/ Tab S4
Restore or Download Photos and Videos from Photos.
To restore back up photos and media log in to your google account on computer, open photos, just go to photos.

Select the files and click download from the option available on the three dots on top right corner of your screen, or click ‘Shift’ ‘D’ and all selected files will be downloaded to the computer storage.

Note: To use all the above services and to keep Backup in sync active network service is required.
Also Read- How To Transfer Data From Old Phone To New Samsung Galaxy S20/ S20+/ S20 Ultra 5G
User Guide: Steps To Backup & Restore Samsung Galaxy A50s/ A50 Data
Method 3: How To Backup Samsung Galaxy A50s/ A50 To Computer.
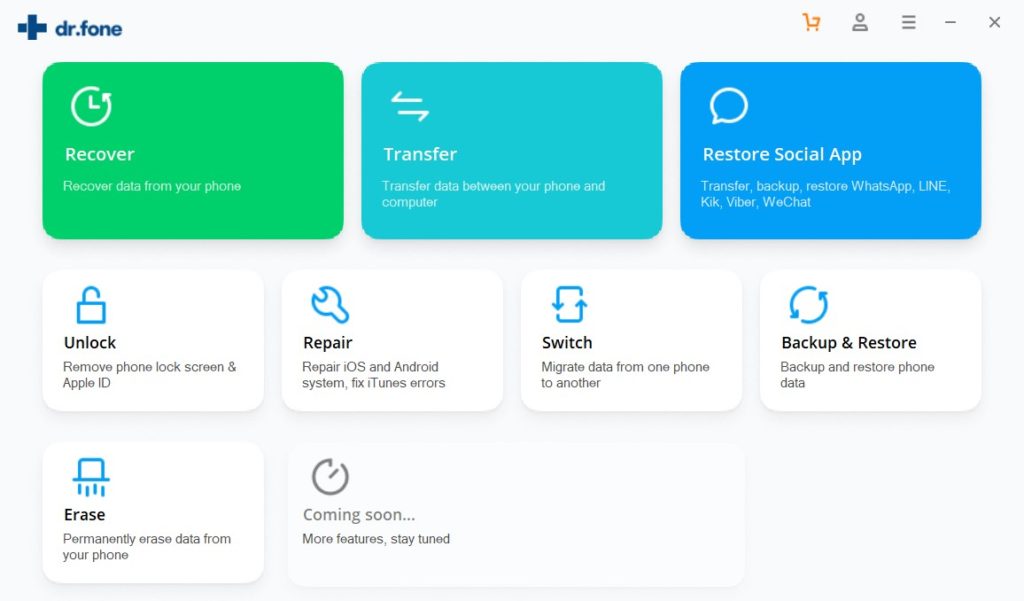
Back Up and Restore Samsung Galaxy A50s/ A50 Data Using Backup and Restore Software.
Here you will discover simple step by step complete tutorials How to use Samsung Galaxy Data Backup & Restore. How It work and help users to restore data from Samsung Galaxy A50s/ A50.
Download Android Backup and Restore Software
| |
Steps To Backup Samsung Galaxy A50s/ A50 Data To PC
Step 1- Connect your Samsung Galaxy A50s/ A50 to Computer
Launch Android Data Backup and Restore software on your computer (PC or Laptop) and select “Backup & Restore” option.
Use a USB cable to connect your Samsung Galaxy A50s/ A50 to your computer. Make sure you have enabled USB debugging on your Android phone. When your Samsung Galaxy A50s/ A50 is detected on your computer you will get a pop up asking you to allow USB Debugging.

If USB debugging is not enabled you will get screen to choose phone’s brand and it will show you how to enable USB debugging in your device. Just click on the brand Samsung and follow the on screen instructions and enable USB debugging.

Now when your Samsung Galaxy A50s/ A50 is connected to your PC, simply click on Backup to start the Android Phone data backup.

In case you have used the software before and backed up the Android data, then you can click on “view backup history” and view past backup.
Step 2 – Choose types of files to Back up
Once your Samsung Galaxy A50s/ A50 gets connected with Computer, choose the types of files you wish to backup, the software is programmed to automatically check all the types of files for you. Now just press on “Backup” to begin the process.

During backup process do not disconnect the Samsung Galaxy A50s/ A50; don’t use your Samsung Galaxy A50s/ A50 or delete any file while the backup process is progress.

Once the complete backup is done, you can press “view the backup” option to see all the files that have been backed up.

Steps To Restore Backed-up Data Back To Your Samsung Galaxy A50s/ A50
Step 1 – Connect your Samsung Galaxy A50s/ A50 to Computer
Launch Android Data Backup and Restore software on your computer (PC or Laptop), then in tools select “Backup and Restore” use a USB cable to connect your Samsung Galaxy A50s/ A50 to your computer.

Step 2 – Choose the backup files to want to restore
Now click on “Restore” the Android Backup & Restore Software will the show all the backed up data and files on your computer, simply now click and select the file you want and press View next to it.

Step 3 – Select and restore the files back to your Samsung Galaxy A50s/ A50
Here you select the files you need, in preview of backup files, just select then press on restore to begin the restore process.

The complete restore process just takes few minutes, please make sure while the process is on you do not disconnect your phone or use it.

Note: To backup Samsung galaxy A50/ A50s data to PC with help of Android Backup & Restore no active network service is required, means can backup & restore without internet.
Also Read- Best Solutions To Recover Deleted Data From Samsung Galaxy S20/ S20+/ S20 Ultra
| |
Bonus Tip:
How to Recover Deleted Data From Samsung Galaxy A50s/ A50 When Have No Backup.
In situation where you accidentally delete important data on Samsung Galaxy A50s/ A50 and you have no backup what to do? In such situation you can recover data from Samsung Galaxy A50s/ A50 with help of Android Data Recovery Software.
Android Data Recovery Software for Samsung Galaxy A50s/ A50 can recover deleted photos, videos, messages, contacts, Whats App chat history, call history, audio, notes, voice memos, documents and much more.
Wrap Up
Above we have explained the best ways, how you can backup and restore your Samsung Galaxy A50s/ A50 and when you have accidentally lost data and have no backup, how you can recover the lost data from Samsung Galaxy A50s/ A50.
You can choose to use what solution suits you best, but would recommend use Android Backup and Restore Software; because it’s very easy to use and its backs up almost all types of files and data and is 100% secure.
Hope this article was helpful, will be back with more such article and guide, if this helped you please share it so that others also benefit from it.
Like & follow us on Facebook & Twitter, ask if have any questions click on Contact Us link at end of page and send us your query, we will help in best possible we can.